PLASTIC DESIGN
API engineers and designers can work with you to develop and design your plastic injection molded component. To ensure a quality part, there are three major areas of focus throughout the design stage:
The designers and engineers at API have over 250 combined years of experience in designing parts for plastic injection molding, selecting materials, and processing resins (specializing in engineering and high performance resins). This guide was designed to demonstrate the basic elements of proper plastic part design.
DESIGNING PARTS FOR UP & DOWN MOLDING HELPS CONTROL COST
Designing a part that can be molded with a "straight pull" or "up & down" motion is a great way to keep the cost of the mold down. A straight pull mold is designed so that when the two halves (A side and B side) of the mold separate from each other, there is no plastic blocking the path of the metal in the direction of the pull. Undercuts on the part cause this blockage of path and require an action in the mold (cams, core pulls, etc.). Action in the mold can have a major impact on the cost (and overall size) of a mold.
UNIFORM WALL THICKNESS HELPS TO PREVENT DEFECTS
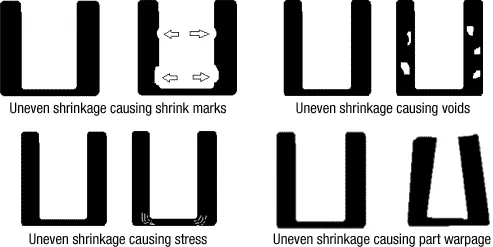
Proper wall thickness is one of the most fundamental requirements in designing a part for plastic injection molding. Plastic shrinks as it cools which can lead to defects such as sink marks, voids, stresses, and warping. Plastic resin solidifies in the mold nearer to the outside of the part (closest to the mold surface). Thick sections of a part tend to pull inward, creating stresses, sink marks, or voids. Since thinner sections cool quicker, stress can build in the part between thinner and thicker sections, resulting in part warpage.

DRAFT ALLOWS FOR PARTS TO RELEASE FROM THE MOLD
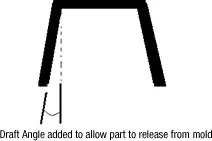
Draft is required on all parts in the direction of mold movement in order to allow parts to release or eject from the mold properly. Draft is the angle in which the part is tapered to allow it to release. As the part cools, it tends to want to shrink to the core side of the mold. Adding draft helps the part to release. Most parts or applications require a minimum of 1/2 to 1 degree, however 11/2 to 2 degrees is widely accepted as the norm.
HOLES ENHANCE PART FUNCTIONALITY AND REDUCE WEIGHT
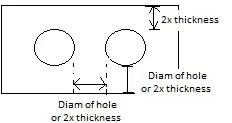
Holes can be added to a part for functionality or to reduce overall part weight (coring). Core pins are typically used to form a hole, preventing the molten plastic from filling in that space. Through holes go all the way through a part. Blind holes do not completely go through a part. Core pins for a blind hole are only supported by one end, so there is a greater degree of difficulty in forming them without defect. Forming holes can lead to defects or have a negative impact on aesthetics. Since the molten plastic flows around the core pin, it can leave a weld line (which may be visible and/or be weaker than the remainder of the part).

BOSSES AID IN ASSEMBLY AND MOUNTING
Bosses can be added to the part design for assembly, locating, or mounting of a part. Improper placement of a boss leads to uneven wall thickness and can have a negative impact on the aesthetics, shrinking, or strength of a part.

RIBS ENHANCE PART STRENGTH AND STABILITY
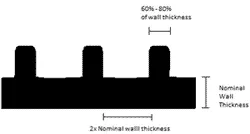
Ribs can be added to parts to add rigidity or stiffness. Adding ribs allows for a part to increase strength and bear a higher load. Ribs too have recommended guidelines to maximize functionality and minimize defects.
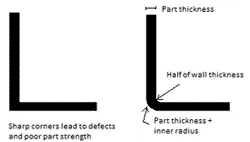
ADDING A RADIUS REDUCES STRESS ON CORNERS
Radii should be added to angles to prevent sharp corners. Corners can lead to stresses, limit material flow, and often reduce part strength.
Material selection and processing conditions are equally important factors in the proper design for a plastic injection molded component or part.
We understand that initially, material selection may seem overwhelming since there are so many materials to choose from. You can rest easy knowing that API has partnered with resin suppliers for over 60 years and has a multitude of experience in manufacturing plastic parts with even the most difficult-to-process resins. Please see our basic resin guide for a few examples of commodity and engineering resins that API has become an expert in molding.