I. Accept the task document
The task document of molded plastic parts is usually made by the designer, which reads as follows:
Basics of Plastic Injection Mould Design
What are the basics of plastic injection mould designing? Now we will introduce the following 10 steps!
I. Accept the task document
The task document of molded plastic parts is usually made by the designer, which reads as follows:
Usually the design task document is proposed by plastic mould design personnel according to the mission statement to the mission statement. The document is the basic of injection mould designing.
II. Raw data collection, analysis
Collect the basic parts design, injection moulding process, injection moulding equipment, machining and special processing information in order to prepare for plastic mould design.
1. Understand the use of parts, analysis the process, dimensional accuracy and other technical requirements.
Acknowledge the outer shape, color transparency, performance requirements, geometry of plastic parts, slope, inserts, extent permitted welding marks, shrinkage and other moulding defects, with or without coating post-processing equipment, electroplating, gluing, drilling and so on. Select the dimensional accuracy of plastic parts up to the size of the analysis to see whether the lower than estimated molded plastic parts tolerance, the ability to meet the requirements of the moulding of plastic parts too. Also, learn plastics and plastic injection moulding process parameters.
2. Analysis and imply the moulding method, equipment type, material specifications, and other requirements of the injection mould structure.
The moulding material should meet the strength requirements of plastic parts, having good flow ability, homogeneity and isotropy, thermal stability. According to the use of plastic parts, injection moulding materials should meet the stained condition metallized, decorative properties, the necessary flexibility and plasticity, transparency or reverse reflection performance, bonding or welding properties and other requirements.
3. Determine the moulding method-using direct pressure method, pressure casting or injection moulding method.
4. Select injection moulding equipment
Depending on the type of injection moulding equipment, therefore it must be familiar with all kinds of equipment performance, specifications and features. For example, the injection machine, you should aware of the following specifications: injection capacity, clamping pressure, injection pressure, mould installation dimensions, top of the device and the size of the nozzle hole diameter and spherical radius nozzle, sprue bush positioning ring size, die maximum and minimum thickness.
To preliminary estimates mould dimensions, it is determined whether the plastic injection mould is installed and used on selected injection machine.
5. Specific structure concept
(1) Determine the type of injection mould
Such as pressing mould (open, semi-closed, closed), die casting, injection mould, etc.
(2) Determine the main structure of mould
Select the desired mould structure is to determine the necessary moulding equipment, the ideal number of cavities, make injection mould itself to work in conditions of absolute reliability of the plastic parts of the technology and production economy. Plastic parts for the technology requirements is to ensure that the geometry of the plastic parts, surface finishes and dimensional accuracy. Production economy requires low cost to make plastic parts, high production efficiency, the plastic mould can be continuously working, long life and save labor.
III. Factors affecting the structure and individual system of the mould:
If these issues were resolved, the formal structure of the plastic injection mould naturally solved. At this point, we should start drawing the mould diagram.
IV. Injection Mould Drawings
Draw the diagram according to national standards, but also requires combined injection mould factory standards and national regulations are not the customary factory painting.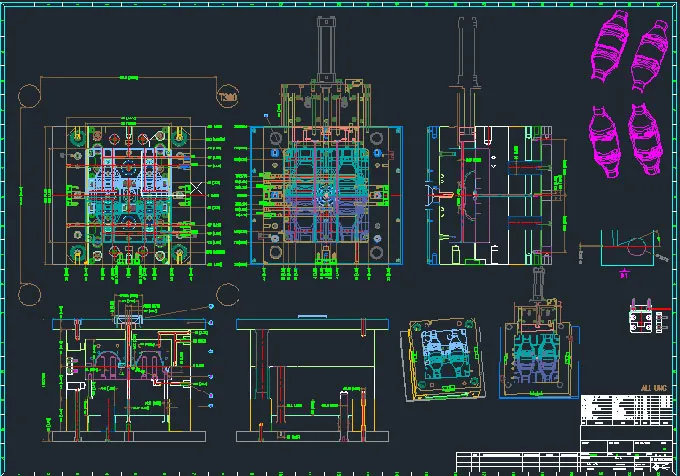
Before drawing the mould assembly diagram, the basic process chart should be drawn, and to meet the requirements of the parts diagram and process data. Write the words "process dimension" noted in the chart by the following procedure ensured size. If the injection mould carries out no other machining, the process drawing will be the same as the diagram.
In the process diagram, it is better to mark article number, name, material, material shrinkage, drawing scale and so on. Generally draw the process diagram on the mould assembly diagram.
Try to draw the assembly diagram in 1:1 ratio, start first by drawing the cavity, a front view and other views should be simultaneously drew.
V. Mould assembly diagram should include the following basic parts:
VI. Mould assembly diagram technical requirements
VII. Drawing all parts diagram
Sequence of drawing parts diagram from injection mould assembly: inner-outer, complex-simple, molded part-structural components.
VIII. Proofreading, reviewing, drawing and blueprinting
Self-proofreading content:
1. Relationship between mould, part and plastic part drawing
See the mould and die parts material, hardness, dimensional accuracy and structure meets the requirements of the plastic part drawing.
2. Plastic part
Plastic flow stream, shrinkage, weld marks, nicks, and whether the draft is affecting performance plastic parts, dimensional accuracy, surface quality and other requirements. Have inadequate designs, whether simple processing, shrinkage of the injection moulding material selection is correct.
3. Forming equipment
Injection amount, injection pressure, clamping force enough, and Xiao muzzle nozzle mould installation, plastic parts of the core, stripping any problems, injection machine is correct contact.
4. Mould structure
5. Mould drawings
6. Check processing performance
Geometry, drawing views and dimensions standard of all parts should be conducive to processing.
7. Re-evaluation main dimensions of supporting tools
In the processing of plastic injection mould making, it should strengthen the inspection, which focused on the dimensional accuracy. After the injection mould assembly is completed, it will be tested by the inspectors in accordance with the table. Mould testing is majority on performance. This is the only way to see the manufacture quality.
IX. Mould testing and modifying
Although the plastic injection mould is designed under selected material, moulding equipment and desired process conditions, but the awareness is often imperfect. After the completion of mould, the trial test should be taken to see the quality. If there are errors, we can modify the injectoin mould.
The reason of plastic parts undesirable is very complex, there are reasons for moulds and process conditions, both of which tend to pay only together. Before the repair the injectoin mould, it should base on the actual situation of plastic parts appear undesirable phenomena, careful analysis research to identify remedial measures after the cause plastic defects. Because the moulding conditions are easy to change, so the general practice is to change the injection moulding conditions when the change does not solve the problem, before considering repair mould.
Repairing mould should be careful. The reason is that once you change the condition of the mould, you cannot make a big transformation and restitution.
X. Collecting information archiving the files
After the test, if the plastic injeciotn mould is not being used, it should be completely erased release dross, dust, oil, and then coated with oil or other rust inhibitors, keeping close to the storage site.
Collect all the basic technical documents from the mould designing to finish processing, such as the mission statement, parts diagrams, technical manuals, assembly drawing, mould parts diagram, underlay, mould design specification, inspection records and repair records according to the provisions of systematically sorting, stapling, numbering archived. This seems to be a lot of trouble, but it is very useful for mould maintenance and new mould designing.