Calibration Methods
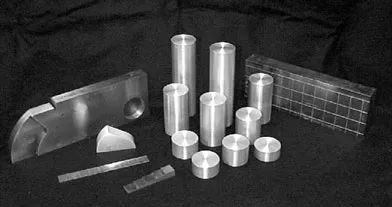
Calibration refers to the act of evaluating and adjusting the precision and accuracy of measurement equipment. In ultrasonic testing, several forms of calibration must occur. First, the electronics of the equipment must be calibrated to ensure that they are performing as designed. This operation is usually performed by the equipment manufacturer and will not be discussed further in this material. It is also usually necessary for the operator to perform a "user calibration" of the equipment. This user calibration is necessary because most ultrasonic equipment can be reconfigured for use in a large variety of applications. The user must "calibrate" the system, which includes the equipment settings, the transducer, and the test setup, to validate that the desired level of precision and accuracy are achieved. The term calibration standard is usually only used when an absolute value is measured and in many cases, the standards are traceable back to standards at the National Institute for Standards and Technology.
In ultrasonic testing, there is also a need for reference standards. Reference standards are used to establish a general level of consistency in measurements and to help interpret and quantify the information contained in the received signal. Reference standards are used to validate that the equipment and the setup provide similar results from one day to the next and that similar results are produced by different systems. Reference standards also help the inspector to estimate the size of flaws. In a pulse-echo type setup, signal strength depends on both the size of the flaw and the distance between the flaw and the transducer. The inspector can use a reference standard with an artificially induced flaw of known size and at approximately the same distance away for the transducer to produce a signal. By comparing the signal from the reference standard to that received from the actual flaw, the inspector can estimate the flaw size.
This section will discuss some of the more common calibration and reference specimen that are used in ultrasonic inspection. Some of these specimens are shown in the figure above. Be aware that there are other standards available and that specially designed standards may be required for many applications. The information provided here is intended to serve a general introduction to the standards and not to be instruction on the proper use of the standards.
Introduction to the Common Standards
Calibration and reference standards for ultrasonic testing come in many shapes and sizes. The type of standard used is dependent on the NDE application and the form and shape of the object being evaluated. The material of the reference standard should be the same as the material being inspected and the artificially induced flaw should closely resemble that of the actual flaw. This second requirement is a major limitation of most standard reference samples. Most use drilled holes and notches that do not closely represent real flaws. In most cases the artificially induced defects in reference standards are better reflectors of sound energy (due to their flatter and smoother surfaces) and produce indications that are larger than those that a similar sized flaw would produce. Producing more "realistic" defects is cost prohibitive in most cases and, therefore, the inspector can only make an estimate of the flaw size. Computer programs that allow the inspector to create computer simulated models of the part and flaw may one day lessen this limitation.
The IIW Type Calibration Block
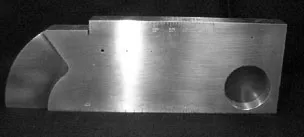
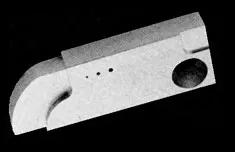
The standard shown in the above figure is commonly known in the US as an IIW type reference block. IIW is an acronym for the International Institute of Welding. It is referred to as an IIW "type" reference block because it was patterned after the "true" IIW block but does not conform to IIW requirements in IIS/IIW-23-59. "True" IIW blocks are only made out of steel (to be precise, killed, open hearth or electric furnace, low-carbon steel in the normalized condition with a grain size of McQuaid-Ehn #8) where IIW "type" blocks can be commercially obtained in a selection of materials. The dimensions of "true" IIW blocks are in metric units while IIW "type" blocks usually have English units. IIW "type" blocks may also include additional calibration and references features such as notches, circular groves, and scales that are not specified by IIW. There are two full-sized and a mini versions of the IIW type blocks. The Mini version is about one-half the size of the full-sized block and weighs only about one-fourth as much. The IIW type US-1 block was derived the basic "true" IIW block and is shown below in the figure on the left. The IIW type US-2 block was developed for US Air Force application and is shown below in the center. The Mini version is shown on the right.
IIW Type US-1
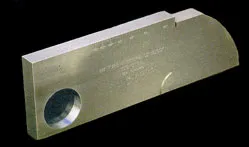
IIW Type US-2

IIW Type Mini
IIW type blocks are used to calibrate instruments for both angle beam and normal incident inspections. Some of their uses include setting metal-distance and sensitivity settings, determining the sound exit point and refracted angle of angle beam transducers, and evaluating depth resolution of normal beam inspection setups. Instructions on using the IIW type blocks can be found in the annex of American Society for Testing and Materials Standard E164, Standard Practice for Ultrasonic Contact Examination of Weldments.
The Miniature Angle-Beam or ROMPAS Calibration Block

The miniature angle-beam is a calibration block that was designed for the US Air Force for use in the field for instrument calibration. The block is much smaller and lighter than the IIW block but performs many of the same functions. The miniature angle-beam block can be used to check the beam angle and exit point of the transducer. The block can also be used to make metal-distance and sensitivity calibrations for both angle and normal-beam inspection setups.
AWS Shear Wave Distance/Sensitivity Calibration (DSC) Block

A block that closely resembles the miniature angle-beam block and is used in a similar way is the DSC AWS Block. This block is used to determine the beam exit point and refracted angle of angle-beam transducers and to calibrate distance and set the sensitivity for both normal and angle beam inspection setups. Instructions on using the DSC block can be found in the annex of American Society for Testing and Materials Standard E164, Standard Practice for Ultrasonic Contact Examination of Weldments.
AWS Shear Wave Distance Calibration (DC) Block

The DC AWS Block is a metal path distance and beam exit point calibration standard that conforms to the requirements of the American Welding Society (AWS) and the American Association of State Highway and Transportation Officials (AASHTO). Instructions on using the DC block can be found in the annex of American Society for Testing and Materials Standard E164, Standard Practice for Ultrasonic Contact Examination of Weldments.
AWS Resolution Calibration (RC) Block

The RC Block is used to determine the resolution of angle beam transducers per the requirements of AWS and AASHTO. Engraved Index markers are provided for 45, 60, and 70 degree refracted angle beams.
30 FBH Resolution Reference Block
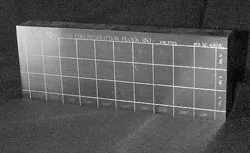
The 30 FBH resolution reference block is used to evaluate the near-surface resolution and flaw size/depth sensitivity of a normal-beam setup. The block contains number 3 (3/64"), 5 (5/64"), and 8 (8/64") ASTM flat bottom holes at ten metal-distances ranging from 0.050 inch (1.27 mm) to 1.250 inch (31.75 mm).
Miniature Resolution Block
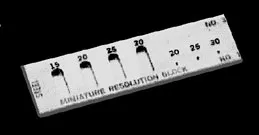
The miniature resolution block is used to evaluate the near-surface resolution and sensitivity of a normal-beam setup It can be used to calibrate high-resolution thickness gages over the range of 0.015 inches (0.381 mm) to 0.125 inches (3.175 mm).
Step and Tapered Calibration Wedges
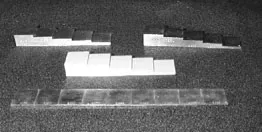
Step and tapered calibration wedges come in a large variety of sizes and configurations. Step wedges are typically manufactured with four or five steps but custom wedge can be obtained with any number of steps. Tapered wedges have a constant taper over the desired thickness range.
Distance/Sensitivity (DS) Block
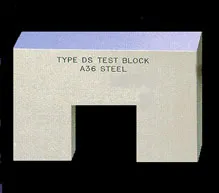
The DS test block is a calibration standard used to check the horizontal linearity and the dB accuracy per requirements of AWS and AASHTO.
Distance/Area-Amplitude Blocks
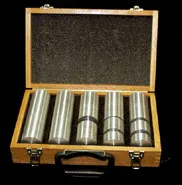 -------
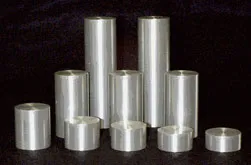
Distance/area amplitude correction blocks typically are purchased as a ten-block set, as shown above. Aluminum sets are manufactured per the requirements of ASTM E127 and steel sets per ASTM E428. Sets can also be purchased in titanium. Each block contains a single flat-bottomed, plugged hole. The hole sizes and metal path distances are as follows:
- 3/64" at 3"
- 5/64" at 1/8", 1/4", 1/2", 3/4", 11/2", 3", and 6"
- 8/64" at 3" and 6"
Sets are commonly sold in 4340 Vacuum melt Steel, 7075-T6 Aluminum, and Type 304 Corrosion Resistant Steel. Aluminum blocks are fabricated per the requirements of ASTM E127, Standard Practice for Fabricating and Checking Aluminum Alloy Ultrasonic Standard Reference Blocks. Steel blocks are fabricated per the requirements of ASTM E428, Standard Practice for Fabrication and Control of Steel Reference Blocks Used in Ultrasonic Inspection.
Area-Amplitude Blocks
Area-amplitude blocks are also usually purchased in an eight-block set and look very similar to Distance/Area-Amplitude Blocks. However, area-amplitude blocks have a constant 3-inch metal path distance and the hole sizes are varied from 1/64" to 8/64" in 1/64" steps. The blocks are used to determine the relationship between flaw size and signal amplitude by comparing signal responses for the different sized holes. Sets are commonly sold in 4340 Vacuum melt Steel, 7075-T6 Aluminum, and Type 304 Corrosion Resistant Steel. Aluminum blocks are fabricated per the requirements of ASTM E127, Standard Practice for Fabricating and Checking Aluminum Alloy Ultrasonic Standard Reference Blocks. Steel blocks are fabricated per the requirements of ASTM E428, Standard Practice for Fabrication and Control of Steel Reference Blocks Used in Ultrasonic Inspection.
Distance-Amplitude #3, #5, #8 FBH Blocks
Distance-amplitude blocks also very similar to the distance/area-amplitude blocks pictured above. Nineteen block sets with flat-bottom holes of a single size and varying metal path distances are also commercially available. Sets have either a #3 (3/64") FBH, a #5 (5/64") FBH, or a #8 (8/64") FBH. The metal path distances are 1/16", 1/8", 1/4", 3/8", 1/2", 5/8", 3/4", 7/8", 1", 1-1/4", 1-3/4", 2-1/4", 2-3/4", 3-14", 3-3/4", 4-1/4", 4-3/4", 5-1/4", and 5-3/4". The relationship between the metal path distance and the signal amplitude is determined by comparing signals from same size flaws at different depth. Sets are commonly sold in 4340 Vacuum melt Steel, 7075-T6 Aluminum, and Type 304 Corrosion Resistant Steel. Aluminum blocks are fabricated per the requirements of ASTM E127, Standard Practice for Fabricating and Checking Aluminum Alloy Ultrasonic Standard Reference Blocks. Steel blocks are fabricated per the requirements of ASTM E428, Standard Practice for Fabrication and Control of Steel Reference Blocks Used in Ultrasonic Inspection.
|