NDT Software Solutions to Empower Automated NDT Systems
Nondestructive (NDT) software represents an essential element of an NDT system. It provides inspectors with the necessary tools to collect and analyze the required NDT data. TecScan has developed some premier NDT software suites, which are designed to be the solution to any NDT scenario. These NDT software solutions focus not only on being efficient but also very user friendly. In this blog we’ll take a look at software that best exemplifies the software capabilities of TecView™: TecView™ 3D.
TecView™ 3D is an NDT software designed for real-time automated ultrasonic inspections of complex parts. The software offers basic and advanced contour following capabilities. The basic contour following capability is perfectly suited for extruded parts or similar structures, while the advanced contour following option is designed to permit automated inspection of more complex parts in full 3D.
Basic contour following means the software in question, TecViewTM 3D, can automatically scan extruded parts with simple curvature (bodies of symmetry), and then manipulate the scans using the full range of TecView™ UT analysis tools. Each scan pass is typically performed in a straight motion and along a single axis, while a multi-axis indexing is done at the end of each scan pass in order to follow the part curvature. Scans can also be performed along a simple curved or inclined surface using multiple axes.
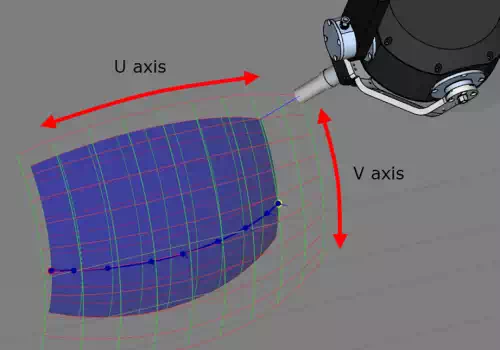
As for the advanced contour following, at least two rotational axes are required to perform a full 3D contour following. The linear axes serve to move the inspection probe at the proper locations while the rotational axes are used to maintain the proper ultrasonic wave entry angle. TecViewTM 3D also allows you to import the CAD files of the inspected parts or to manually teach the part geometry so the system can generate inspection trajectories. TecView TM 3D will also performs complete validation of the generated or calculated trajectories, taking into account the necessary inspection water path (distance between the probe and inspected sample), probe angle and the mechanical limits of the system.
TecView 3D illustration of the calculated trajectories
With the data stored and tagged, the analysis of the collected data may be preformed in the ANALYSIS module. Partial or full C-Scan in addition to A-Scan and B-Scan images are obtained with a click of the mouse. The C-Scans can be obtained based on amplitude information, TOF or thickness. Signal and image filtering, as well as rotation, inversion and 3D projection can be performed on the C-Scans.
The following figure shows an example of the results obtained on an L-shapes, curved composite material sample with simulated disbonds.
TecView 3D C-Scan results of composite sample with simulated disbonds
In conclusion, TecScan’s software suite not only reaches maximum efficiency on a current task, but also creates efficiency for any future actions, be it the diagnostics of a scan or an automated scan in the near future. With a wide selection of software brands, TecViewTM modules can be chosen to match the testers needs

