INFRARED THERMOGRAPHY AS A NON-DESTRUCTIVE TOOL
Introduction
Infrared thermography for non-destructive testing and evaluation (NDT & E) aims at the detection of subsurface features (i.e. subsurface defects, anomalies, etc.), owing to temperature differences (DT) observed on the investigated surface during monitoring by an infrared camera. At temperatures above absolute zero all bodies emit electromagnetic radiation. Infrared thermography or thermal imaging is a measurement technique based on the detection of radiation in the infrared spectrum (usually in the 2-5.6 mm and 8-14 mm regions). These two spectral bands are commonly used because of their low atmosphere absorption.
The principal problem where infrared measurements are concerned is the emissivity[1], emittance of the material(s). Provided that an infrared camera detects and records the radiation emitted by a material under investigation and renders this energy to a temperature - thermal image, the characteristic that describes the relation between the emitted radiation and the material's temperature, is termed as emissivity. Emissivity is actually a surface property that states the ability of the investigated material to emit energy. Values for emissivity (e) can be between 0 (perfect reflector - mirror) and 1 (perfect emmiter - blackbody). As a result, emissivity plays an essential role in infrared thermographic surveys and is dependent on temperature, wavelength and surface condition. A surface with a low emissivity value (i.e.aluminium, steel, etc.) acts as a mirror (high reflectance). However, such problem is usually overcome using high emittance flat paints (i.e. black colour water based paints) for painting the investigated surface(s).
Approaches
Infrared thermography is deployed by two approaches; passive and active. With the passive approach thermography is used to investigate materials that are at different temperature than ambient (often higher), whilst in the case of the active approach an external stimulus source (i.e. optical flash lamps, heat lamps, hot or cold air guns, etc.) is used in order to induce relevant thermal contrasts. The most regular applications of the passive approach in NDT & E are for buildings and infrastructures, maintenance, components and processes, and medicine. In most situations, passive thermography is used for qualitative assessment (although this is not always the case), given that the objective is to detect irregularities of the kind function or malfunction.
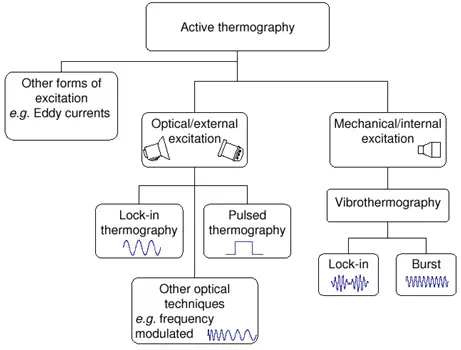
Figure 1: Transient thermal NDT approaches
The active approach has also several applications in NDT & E. The temperature differences during the transient phase appear on the material surface and so detection of subsurface defects is possible (areas of different temperatures when compared to the sound part(s) due to the different thermal diffusivity). Since the heating or cooling features of the stimulus source are identifiable by considering the time factor quantitative assessment is also feasible. The most common modes of active thermography are pulsed thermography, long pulsed heating or step heating transient thermography, optical lock-in thermography, and ultrasound lock-in thermography.
Advantages - limitations
The main advantage of infrared thermography over the destructive testing techniques is that large areas can be scanned fast and with no need to be destroyed during testing. This results in major savings in time, people, work and machinery. In addition, there are advantages of infrared thermography over the other non-destructive techniques. The infrared thermographic device is risk-free, as it does not emit any radiation; it only records the infrared radiation emitted from the material that is under assessment. Moreover, infrared thermography is an area investigating technique, whereas most of the other non-destructive methods are either point or line testing methods. Furthermore, infrared thermographic testing may be performed during both day - and night - time hours.
Thermography, due to the fact that it uses infrared technology it is not possible to penetrate in extended depths (only a few mm's). That of course is one of the main limitations of the technique. Finally, environmental conditions also play an important role on outdoor infrared thermographic surveys utilising the passive approach (i.e. cloud cover, solar radiation, wind speed).
Assessment of defects under composite patching
A composite repair patch was investigated both experimentally and by modelling, with the intention of assessing an artificially introduced delamination (Teflon). The patch was a 6-ply boron epoxy composite material that was applied on an Al 2024-T3 surface. The dimensions of the Teflon were 25 mm x 25 mm and it was positioned between the 3rd and 4th ply of the composite patch (120 mm long x 70 mm wide). The thickness of each ply was 125µmm.
Experimentally the panel was investigated using a portable state-of-the-art thermographic system (Thermoscope) with an integrated flash heating system (duration of flash heating time 3.1 ms) employing a medium-wave infrared camera (Merlin 3-5µmm by Indigo). The infrared camera uses a cooled indium antimonide detector with a frame rate of 60 Hz, a focal plane array pixel format of 320 (H) x 256 (V) and an optical lens of 13 mm focal length.
For the purposes of thermal modelling, the ThermoCalc-3D software was employed. It is based on solving a heat conduction problem by means of an implicit finite-element numerical scheme. The software was used in order to calculate the three-dimensional (3D) temperature distributions of the various layers of the panel and provide information about the delamination in space and in time. The specimen was heated uniformly, whilst the thermo-physical properties and heating time parameters shown in Table 1were used for the modelling.

Table 1: Parameters used during modelling
In Figure 2, a thermogram with representative line profiles from the investigated panel are presented. The delamination was detected by thermography. Line profiles (on both axes) at various times from the obtained thermal images were plotted in order to obtain information about the size of the delamination in relation to the thermal transient time (e.g. possible shrinkage due to thermal diffusion). From the line profiles it was possible to calculate the size of the delamination employing the Full Width Half Maximum (FWHM) approach.

Figure 2: Thermogram and representative line profiles of the investigated composite panel
Thermal images, spatial profiles and thermal contrast curves of the panel from the thermal modelling run are presented in Figure 3. The results give a good indication of how the composite material responds to thermal heating. It shows the behaviour of a delaminated composite material after it was heated with a thermal excitation source uniformly in order to detect a sub-surface defect by means of pulsed thermography.
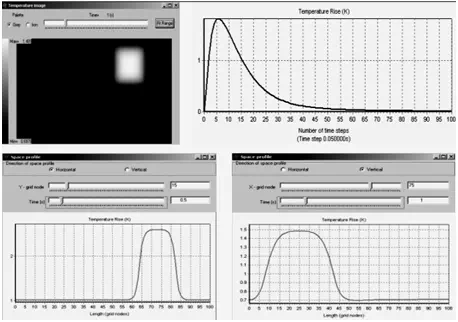
Figure 3: Thermal modelling results of composite panel. Upper graph shows development of contrast, Delta T, over defect with time. A thermal image and spatial profiles in both axes (X and Y) are also shown.
Therefore, from the obtained results it is shown that experimentally or by the use of thermal modelling it is possible to evaluate (qualitatively and quantitatively) near surface delaminations in composites.
Quality assurance and structural evaluation of GRP pipes.
The Thermoscope system with the Merlin infrared camera was again utilised for the experimental treatments within this research work. A total of three samples - components were manufactured and examined using the thermography kit; in some instances due to the complexity of the investigated samples, external thermal excitation sources (i.e. hot air of 1200 Watts or optical lamp of 500 Watts) were also employed as alternative solution of active thermographic investigation. Furthermore, pulsed thermography (PT) and pulsed phase thermography (PPT) were used for evaluation of the components[2]. In the case of PPT either a Santa Barbara Focal Plane SBF125camera (14 bits, InSb 320x256 FPA, 3-5µm, nitrogen-cooled) or a ThermaCAMTM Phoenix® from FLIR Systems (14 bits, InSb 640x512 FPA, 3-5µm, Stirling closed cycle cooler). Two high power flashes (Balcar FX 60), providing 6.4 KJ for 2-10ms each, were used as heating sources. Thermographic data was analyzed with a PC (Pentium 4, 2 GB RAM) using MATLAB® language from The MathWorks, Inc.
Representative thermal images of the investigated samples were obtained during the transient phase of the thermographic inspections and are presented. In some instances, plots of the contrast versus the transient time of the identified defects were performed; the difference in intensity (D Intensity) between the detected defect and the sound region of the sample against the transient time during the cooling down process was plotted.
Although the best possible results concerning the size of a detected defect were attained at particularly short transient times, the highest contrast images were acquired at relatively longer times.
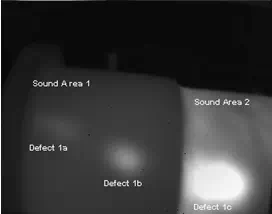
Figure 4: Thermal image of investigated pipe after 0.935 seconds of heating
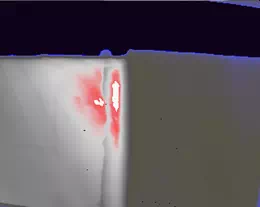
Figure 5: Thermal image of investigated pipe after 13.560 seconds of heating revealing kissing bond defect on the pipe
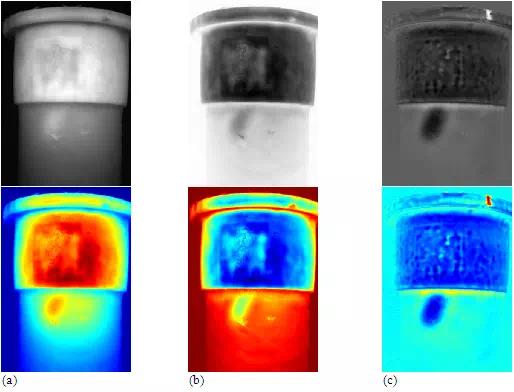
Figure 6: Defect 'A': (a) gray (top) and 'jet' (bottom) raw thermograms at t=0.92 s; (b) first time derivative image (from a 7th degree polynomial fitting) at t=2.85 s; (c) second derivative at t=1.49 s.
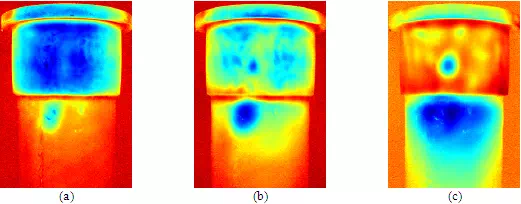
Figure 7: Defect 'B' second derivative images (from a 7th degree polynomial fitting) at t=(a) 1.26 s; (b) 3.19 s; (c) 7.51 s.
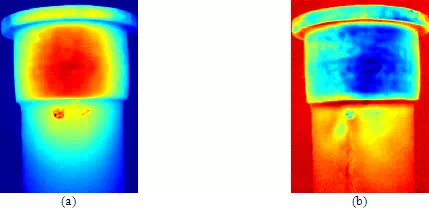
Figure 8: Defect 'C'. (a) raw themogram at t=1.26 s; (b) second derivative image (from a 7th degree polynomial fitting) 2.17 s.
Since the thermal conductivity of all these three inspected samples is relatively low, the samples were tested using a reasonably low maximum frame rate. A frame rate of 15 Hz was used; with the exception of the pipe that presented impact damage, where a higher frame rate (60 Hz) was needed. Furthermore, in order to avoid the high reflectance of the pipes during investigation and so record thermal images, the samples were either painted with black colour water based paint or even polished by applying a silver polishing substance (i.e. silvo).
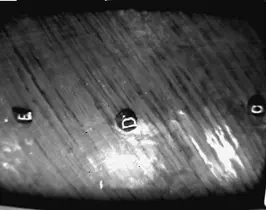
Figure 9: Thermal image of investigated impact damaged area after 0.017 seconds of heating
Impact damage on CFRP panels and honeycomb sandwich structures
Damage caused by low velocity impacts is a particular concern in the aircraft industry. In this work, impact damaged CFRP panels (150 x 100mm) of 2mm thickness (16 ply with a quasi-isotropic lay-up), as well as sandwich composite samples formed after bonded to the two faces of 25 mm thick Type 6 Nomax honeycomb core were investigated. All panels were cut from the same sheet. A falling weight impactor with a hemispherical 12.5 mm radius head was used to apply impacts of controlled energy. During impact, the samples were supported around their edges over a 125 x 75 mm aperture, allowing the bulk of the panels to rebound freely on impact. The Thermoscope pulsed transient thermographic system, employing the medium wave infrared camera (Merlin 3-5µm by Indigo), was used to image the impact damage.
PT is a rapid large area technique with the additional advantages of being single-sided and non-contact. These attributes make this technique particularly suitable for surveying either single panel or sandwich structures for impact damage. Examples of thermography images impact damage in the two types of samples are shown in figure 10. In addition to the evident difference in defect size, the sandwich sample image contains a high contrast component caused by a delamination close to the surface. A comparison of contrast vs. elapsed time for the two images shows contrast peaking at a much earlier time for the sandwich sample, consistent with delaminations close to the surface. The size and the through thickness characteristics of the impact damage produced in single panel and sandwich samples are reflected in the NDT images obtained by PT. The technique has been shown to be effective for detecting and imaging impact damage in either isolated panel or sandwich samples.

Figure 10: Thermal images of 12.75J impact damage in a panel sample (left) & in a sandwich sample (right) taken 0.5s after flash heating.
Conclusions
Transient - active thermography has emerged in recent years as a means of NDT & E technique. Its advantages are that it is a rapid large area non-contact imaging technique that produces images of subsurface features (i.e. defects) that are relatively straightforward to interpret. In this work, thermography trials took place on different components - applications. In some instances, the technique provided prompt results. Nonetheless, thermography is an inherently near surface technique whose effectiveness will decrease with the material's thickness[3]. It also depends on the thermal properties of the material (different behaviour between high thermal conductive materials such as metals and lower thermal conductive materials such as composites).