GD&T Tutorial on Limits and Fits
Understanding the concept of the
limits and fits is very important for a mechanical design engineer. This
geometric dimensioning and Tolerancing (GD&T) tutorial will explain the
concept with an example.
If you are designing a
shaft and hole pair then you have to use the limits and fits. Typically
the GD&T limits and fits of a shaft and hole pair are represented by a
group of numbers and alphabets, like: 90H7g6. By specifying
such sets of numbers and letters in the drawing, you will actually provide all
the necessary information required for manufacturing the shaft and hole pair.
Specifying Limits and Fits
But how to specify it? For specifying
the limits and fits you decide the following three parameters:
○ Basic Size: Decide what should be the basic size of the shaft
hole pair. It is the dimension to which tolerance are specified.
For example, 90~+mn~0.5 has
the base dimension of 90.
The base dimensions of both the
shaft and the hole should be same.
○ Fits: Decide what kind of fits you require for the shaft
and hole pair. Is it clearance fit or interference fit? On the basis of this
decision you will select the two alphabets (H and g of the previous example) of
the limits and fits specification.
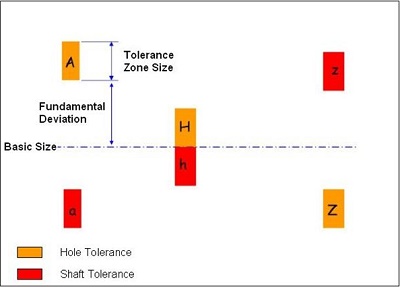
For specifying the hole you will use
the capital letters from A to Z. And for
specifying the shaft you will use the small letters from a to z.
If you require clearance fit, then
use a capital alphabet between A to H (for specifying hole)
and a small alphabet between a to h (for specifying the shaft).
If you require interference fit, then
use a capital alphabet between H to Z
(for specifying hole) and a
small alphabet between h to z (for specifying the shaft).
For the hole base system, hole
tolerance should be H and for the shaft base system the shaft
tolerance must be h.
See the figure below for better
clarity:

As you move from A to H (or a
to h), the fundamental deviation will decrease, again if you move
from H to Z (or h to z) the fundamental deviation
will increase. So, select the shaft and hole tolerance symbols based upon your
fundamental deviation requirements.
○ Tolerance Grade: The numbers written after the each alphabet (7
and 6 for our previous example) signifies the tolerance grade. You can specify
any number between 2 to 16. Lesser the numbers, tighter the tolerance zone.
Tighter the tolerance zone, more precise machining operation is required. In
other words lesser the tolerance grade costlier the machining process.
You have to use the ISO 286-2
table (Hole and Shaft Tolerances) for finding out the maximum and the
minimum tolerance value for a specified basic size and tolerance grade. How?
See the next example.
Example
Say, you have to design a 20 mm
diameter (basic size) shaft and hole pair of close running fit to be
manufactured by reaming and turning process. Take hole base system.
Solution:
○ For hole base system, the hole
tolerance zone symbol must be H.
○ For close running fit, the combination of Hf is
good enough.
○ For reaming and turning process, the tolerance
grade should be 8 and 7 for the hole and
shaft respectively.
○ So, the final limits and fits specification
becomes: 20H8f7.
○ According to the ISO 286-2 tables,
for 20mm basic size the tolerance limits for the hole (H8) are: 0 and 0.033 and
for the shaft (f7)are: - 0.020 and 0.041. This
is the cross check.
Conclusion
You have to apply
the GD&T concept of the limits and fits for design of shaft and
hole pair. While specifying the geometric dimensioning and Tolerancing limits
and fits you should be aware about the machining process, allowable fundamental
deviation, and kind of fits for the hole and shaft pair.