Finite Element Analysis workflow
Below I will give you the FEA workflow with short descriptions what to do in each step.
FEA Workflow 1: Geometry
This is the part that is the most obvious. Whatever you will do, it is best to implement geometry “somehow” into the system. Imagine we want to design a cantilever that looks like this:
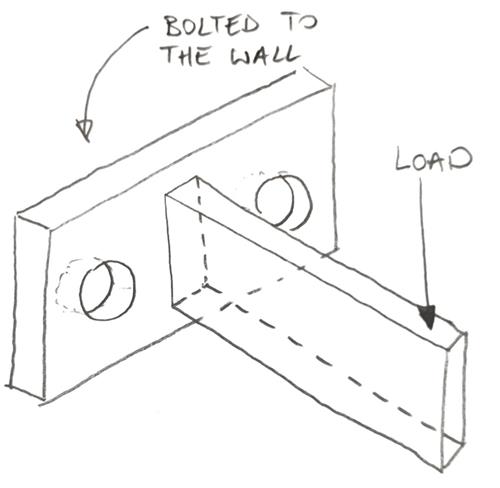
The first thing to do would be to implement geometry of this example into our software. You can do this in 2 ways:
- Geometry import from CAD: A very popular solution where you don’t do geometry in your FEA preprocessor. This assumes that you actually have a 3D model of the part made my someone doing CAD in your company. Software like Inventor or Solid Edge have much more “possibilities” when it comes to creating geometry. In many preprocessors there are only basic functions when it comes to this aspect, so creating a geometry in an “external” program and importing it makes sense.
- Creating geometry in preprocessor: This is the second approach. Instead of using other programs to do it you can simply create the geometry in the “FEA software” from scratch.
You should know that both approaches have good and bad sides. Depending on what you do, and what type of 3D model you can get it is better to switch approach. Without a doubt importing geometry is the more popular approach. But be aware that sometimes when you get a 3D model it is simply less work to do it once more than to “clean it up”. But this is a topic for completely different post altogether!
At this stage, you should also decide whether you will model your case as a solids shells or beams (or a mix of those). This is a very broad topic, for now, let’s assume that we are making a solid model.

A small twist: you don’t need the geometry! Literally, when solver will do the calculations it won’t even “see” it. This means that you can only create mesh without geometry and it will still work (equally well). This has sense in some situations but most likely you will do geometry at the beginning anyway! This is because geometry makes it easier to make mesh most of the time.
Also sometimes creating geometry requires some additional steps. Sometimes you need to make “an assembly” out of the parts you have created (so the software knows where are things in relation to each other in space). This is however software dependent (and usually pretty easy to do as well).
FEA Workflow 2: Material / Boundary conditions / Loads
- Material properties: At the very minimum you need to explain to the software which part is made of what material. This is however not everything! Even when you decided what materials shall be used you should also decide what material models will you consider (i.e. will the material be linear elastic or will have plastic behavior or something else)
- Boundary conditions: I’m tempted to say that this is the most important part of FEA. Without a doubt, you need to support your model in order to calculate it. Just be aware that this is actually more complex than it may seem
- Loads: Without the loads, there is nothing to analyze right? Again a lot can be said about applying loads. Just remember that there are different types of loads.
Note on geometry applied loads / BC: We haven’t meshed our model yet. This means that BC and loads are applied to geometry rather than mesh. Usually, this is a good idea, but it may not be possible in some cases. As a rule, I prefer to load and support the geometry rather than mesh (both are doable). Thanks to such approach, when I re-mesh my model (i.e. to make mesh refinement) I won’t have to check/correct the loads and supports.
Somewhere here you also define contacts and contact properties. This is, however, a bit more advanced thing.
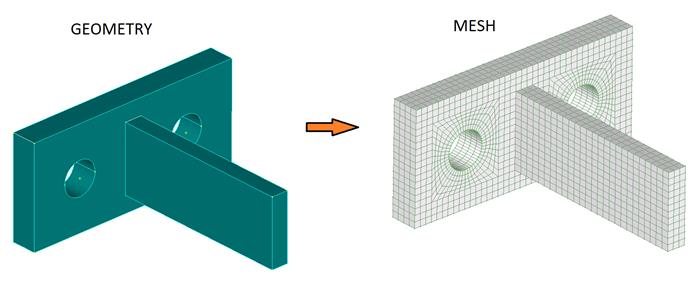
FEA Workflow 3: Meshing
Most important aspects of meshing are:
- What element types to use
- How to actually mesh the thing (which is a skill on its own)
- How to check if the mesh size is ok?
If you are creating a model without geometry this is where you start (and then apply loads and everything else from step 2 onto the mesh).
To be fair it should be said that this step and a previous step mix together. Without a doubt, you create properties first and then you do mesh, but you can easily load the model after meshing. This means that you will often switch the order of those things depending on the task you are doing.This is a big and time-consuming process so it “deserves” a separate entry!
FEA Workflow 4: Analysis
The analysis is something that you actually do in the different software even though usually it’s hard to tell. Usually, an FEA software has 2 parts:
- Pre and post-processor: This is where you set up the model, define everything that is to define and after that, you send an input file to the solver. Then solver does its thing. Then you get back to post processor to see the results.
- Solver: Think about a solver as a geek in the family. While everyone makes everything looks nice, he is the only one who can actually solve the problem. However, he is usually so deep into the “calculation” of things that he only understands “geek language”. This means you need to talk to his family (the preprocessor) so they can explain to the geek (solver) what is to be done. And then the family will tell you what the outcomes are (post-processor). If the geek would do it himself… it would be hard to understand! Still… learning geek language is SO MUCH FUN.
- Note that there should be a separate manual for the solver and separate for pre/post processor. What happens is that the software you use generates the “input file” that looks a bit like a programming language (but a bit simpler). Then it sends this file to solver (automatically), and solver based on the file does the calculations.
Remember when I wrote that solver usually doesn’t see geometry at all? This is because geometry is not translated into the input file – there is no point to do that. From solver standpoint only mesh matters when it comes to “shape”.
When solver finishes it splits out an “output file” – post processor will import it and simply display the outcomes for you. Both input and output files can be read in a simple text editor.
The analysis is the biggest thing for me in FEA, even though sometimes it’s just “one click”. You can set up so many awesome things here like geometrical nonlinearity or material nonlinearity.
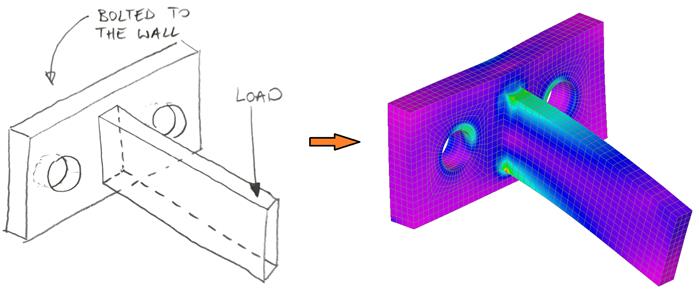
FEA Workflow 5: Post-processing
Usually, you get a lot of different outcomes from an analysis. Post processing is the part where you see all the important results and do some additional checking. For the software, it is only a “display results” function (even though those can be really complex). However, as an engineer, you will do more. It’s not sufficient to simply see the outcomes and paste them into a report. You need to think if the outcomes are correct if no mistakes were made etc. Most importantly however you need to decide if you accept such an outcome or does the thing need strengthening (or is there a chance for more optimization).
In fact, this checking if the part is actually ok based on the outcomes is a skill in post-processing. Getting the outcomes is usually easy.