Classification of Metal Forming Processes
In these processes the plastic state is reached by application of uni-axial or multi-axial compressive forces. Examples are forging, extrusion, rolling, indenting, coining, etc. (Fig. 2.2) shows the stress states in the material during rolling, forging, coining and extrusion processes. In the rolling process in Fig. 2.2(a) the metal ingot or sheet is pressed between two rotating rolls.
Besides the compression by rolls, the friction between the work metal and surfaces of rolls also gives rise to compressive forces in the longitudinal and lateral directions. Thus, there are compressive forces all around though of different magnitudes at different locations and in different directions.

Similarly, in open die forging in Fig. 2.2(b), the metal body is pressed between two flat or curved dies, while the friction between metal and dies gives rise to compressive forces in the lateral directions. In closed die forging and coining processes also there are compressive forces all around in Fig. 2.2(c).
In direct extrusion in Fig. 2.2(d) the metal is compressed in a container, generally a cylinder, and made to flow though a small opening in the die. The force applied by press ram and the constraint of cylinder walls produce compressive forces all around on the work piece.
Rolling, forging and extrusion are in fact groups of processes. For example, rolling comprises the following processes.

Figure 2.4 illustrates four types of longitudinal rolling processes. Figure 2.4(a) is the conventional longitudinal rolling, which is used for rolling sheets, plates, strips, bars, angle sections, beams, rails, etc. For rolling of each of these sections a number of rolling machines generally called rolling stands are employed. Each reduction is called roll pass. A number of passes are required for rolling any one section.
Most of these products are produced on large scale and in various sizes, therefore, groups of rolling machines called rolling mills are devoted for producing a range of similar profiles. These mills are called by the name of product they produce. Thus we have billet rolling mill for rolling billets which are rectangular sections. Other names are rail and heavy section mill for rolling rails, large size angles, beams, etc.
Similarly plate rolling mill for rolling plates. Other names are hot sheet rolling mills, cold sheet rolling mills, etc. Small sections like bars, small angle sections, strips, etc., are generally rolled in re-rolling mills which are also known as Merchant section rolling mills.
Ring rolling is illustrated in Fig. 2.4(b). The process is used for rolling of ball bearing races, rail-wheel-tyres and other thick rings used in many different applications. The machine consists of a small diameter inner roll and a big diameter outer roll. Besides, two conical rolls are provided for rolling the edges flat.
Figure 2.4(c) shows planetary rolling which is used tor hot rolling of strips. The idea is to use small diameter rolls in which case the rolling load is less compared to that in large diameter rolls. But the small diameter rolls have to be supported by big diameter central rolls.
The figure shows the design in which a double row of rolls revolve around a stationary central roll. The main benefit of this process is that a large reduction up to 95% may be achieved in single pass while in a conventional rolling pass it is nearly 30% only.
Splines are generally machined, but these may also be rolled as shown in Fig. 2.4(d). In this method an even number of splines may be rolled because two rolls, placed diametrically opposite on shaft, roll two splines in one go.
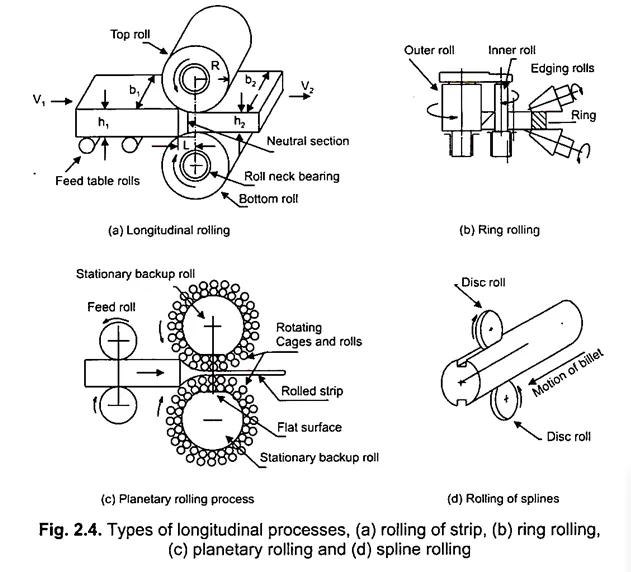
Figure 2.5 shows different transverse rolling processes. In these processes shapes are rolled on the periphery of cylindrical work pieces. Examples are rolling of V-threads, gears, toothed wheels and pulley shaped components, etc. Thread rolling processes are illustrated in Figs. 2.5(a) & (b). Figure 2.5(a) illustrates rolling of threads on a bolt by rolling between two rotating threaded rolls while in Fig. 2.5(b) illustrates thread rolling between two flat threaded dies. There are other thread rolling processes too. Rolling of spur gears is illustrated in Fig. 2.5(c). In such an arrangement blank is rolled between two master gears. This process is generally used for hot rolling of gears.
For making seamless tubes solid bars are pierced in hot state in a piercing process illustrated in Fig. 2.5(d). This is followed by a number of processes for reducing the diameter and the thickness of tubes in order to obtain the desired diameter and thickness. The tube drawing processes, illustrated in Fig. 2.12, are also used for the purpose.
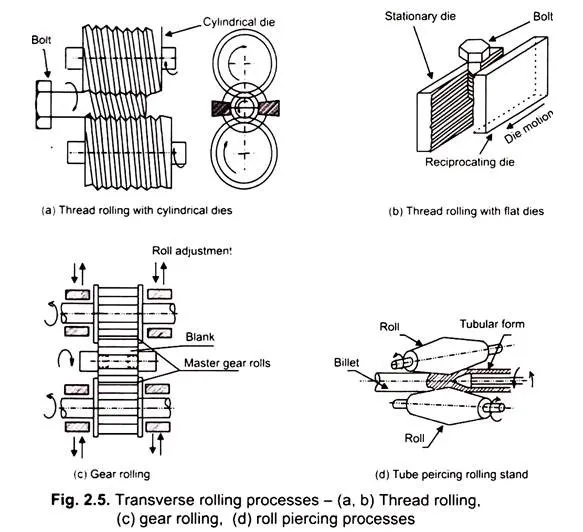
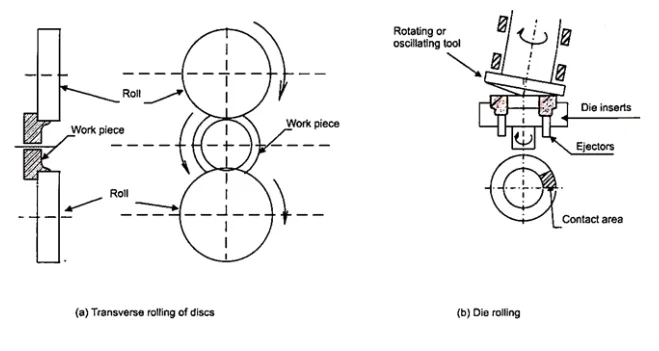
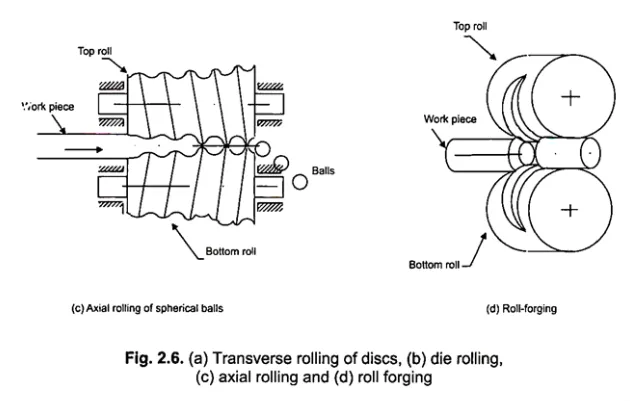
Figure 2.6(a) illustrates transverse process used for rolling of discs. The figure shows rolling of ball bearing cups used in bicycles. The outer ring of free-wheels is also manufactured by a similar process. The process is also used to roll pulley like components from a solid disc. Figure 2.6(b) illustrates die rolling. The rotating conical tool-end successively pushes the material into the die cavity by small amount in each revolution.
ADVERTISEMENTS:
To cover the entire circumference either the fixture carrying the die sets is rotated or the rotating tool axis is oscillated around the work piece axis. A major advantage of the process is that it is noiseless. The process finds application in noiseless riveting. Figure 2.6(c) illustrates axial rolling which is used for rolling of spherical balls. The process of roll-forging is used for rolling of small components, Fig. 2.6(d). It may also be used for rolling of shaped small shafts of different cross-sections.
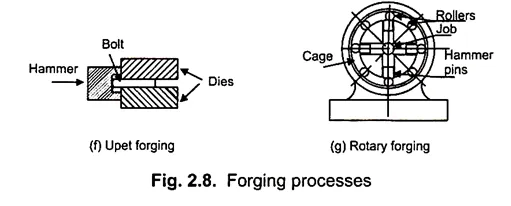
The different forging processes are listed below in Fig. 2.7 and illustrated in Fig. 2.8.
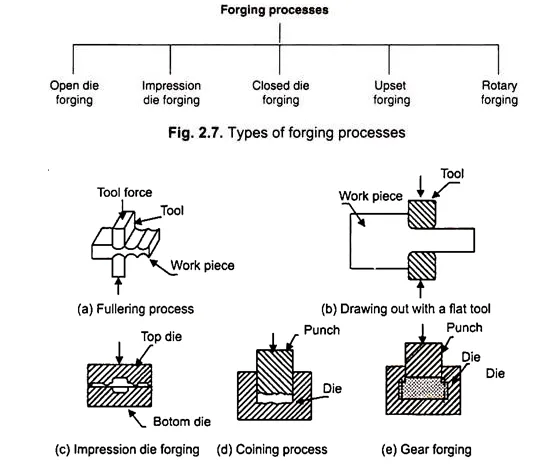
Open die forging includes a number of processes such as drawing out, fullering, swaging, upsetting or heading, etc., which are carried out by flat or curved dies and tools. Drawing out and fullering processes are used for elongating a bar with the help of flat or curved dies in Figs. 2.8(a, b).
The surface produced by curved tools is not flat. Figure 2.8(b) illustrates flattening as well as elongating with the help of flat tools. Most of the forged components are made by impression die forging in Fig. 2.8(c). It may involve making a pre-form which is finally forged in an impression die in which the extra material is squeezed out into gutter space through a flat restriction which forms flash. Gutter material and flash are trimmed off the forging.
Coining and gear forging are examples of closed die forging Figs. 2.8(d) and (e). Bolts, rivets and other headed components such as cylinder valves for I.C. engines are manufactured by upset forging processes, Fig. 2.8(f).
Rotary forging in Fig. 2.8(g) is a process of elongating a circular or other axi-symmetric shapes with the help of radial hammers which are pressed on to the work piece by rotating rollers. The process is also used for pointing the front end of bars and tubes for wire and tube drawing processes.
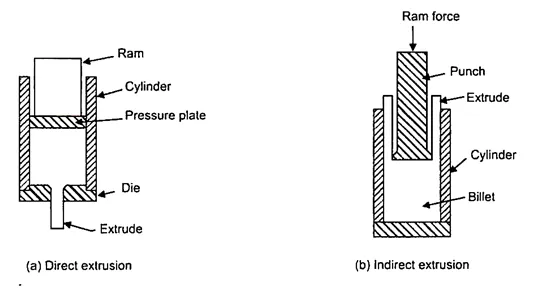
The different extrusion processes are listed (Fig. 2.9).

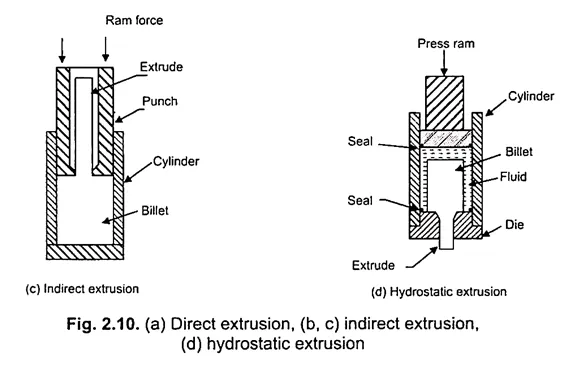
The direct extrusion is shown in Fig. 2.10(a). The billet is placed in a cylinder. On the other end of the cylinder a die with a hole corresponding to the shape of extrude is fixed. The billet is pressed by press ram against the die through a pressure plate. The billet material is forced to flow out of the die hole.
The process is used for manufacture of circular as well as non-circular bars and tubes, angle sections, beams of various cross-sections, etc. Both the ferrous and non- ferrous metals and alloys are extruded. For non-ferrous materials particularly aluminum this is the most cost effective method of manufacturing bars and tubes of various cross sections.
In indirect extrusion, illustrated in Figs. 2.10(b) & (c) the motion of extrude is in direction opposite to that of the press ram. Since both the extrusion set up as well as the extrude are to be accommodated in the daylight opening of the press, long products cannot be manufactured. It is, therefore, used for manufacturing short length components such as tooth paste tubes, gun shells etc.
Hydrostatic extrusion process is illustrated in Fig. 2.10(d). In this process, the billet is pressed through fluid pressure, therefore, the billet material does not spread to touch the cylinder wall. Hence there is no cylinder-wall friction and full press capacity is used for extrusion. In the direct extrusion a considerable part of press capacity is used against the frictional forces on the cylinder wall. The other benefit is that slightly brittle materials can also be extruded successfully.
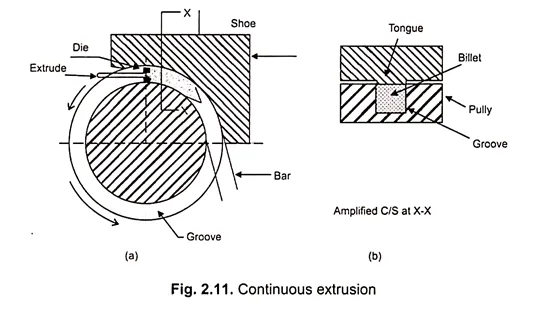
Several ideas have been tried to make direct extrusion a continuous process. Most of them have failed. The successful continuous extrusion device is illustrated in Fig. 2.11. The machine consists of a wheel on the periphery of which a groove is machined. A stationary shoe with a tongue is used to cover the groove. Thus a groove of rectangular cross-section is obtained.
At the one end of the shoe the billet is inserted, which is pulled in by the rotating wheel. At the other end of the shoe a die with a hole of desired shape is fixed. As the wheel rotates, the frictional force on the three sides of the groove pushes the billet against the die.
The fourth side of groove (shoe side) is stationary and exerts frictional force in opposite direction. However, there is net forward force which extrudes the metal through the die hole. The length of groove required for generating the required extrusion pressure can be calculated.
In these processes the plastic state is reached under combined action of tensile and compressive forces (Fig. 2.12). Examples are wire drawing, tube drawing, deep drawing etc. In wire drawing, for instance, wire is pulled through a conical die which is made of hard metal. The taper die surface exerts compressive reaction on the wire material as shown in Fig. 2.12(a).
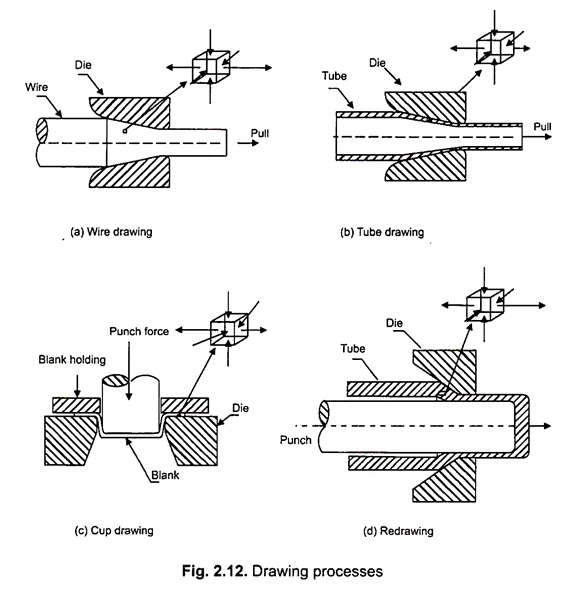
The plastic deformation takes place under the die pressure and the tension due to pull. In order to reduce the pressure on the die surface a back pull may also be used. A similar state of stress prevails in tube drawing as well, which is illustrated in Fig. 2.12(b). The process illustrated by the figure is called tube sinking, i.e. tube drawing without a mandrel. If it is desired to size the internal dimension of the tube, a fixed mandrel may be used.
In deep drawing or cup drawing (Fig. 2.12c), the flange is kept pressed between the blank holding plate and the die surface while the press ram pushes the sheet into the die. As a consequence the flange material is pulled radially towards die centre. Thus the flange material flows under radial tension and compression by blank holding plate.
Further on the die corner radius called die profile radius the sheet bends and slides over the radius and then unbends to become part of cup wall. In drawing cups of square or rectangular shapes additional radial stresses may have to be induced in the sheet which forms the flat portion of cup. This is carried out by providing braking beads or shoulders in die and blank holding plate.
A similar state of stress is experienced in the re-drawing of drawn cups in order to reduce external diameter or thickness of cup wall as shown in Fig. 2.12(d). The work piece material is compressed by die and mandrel, while it is pulled through the die.
The different types of redrawing processes are discussed below:
Redrawing Processes:
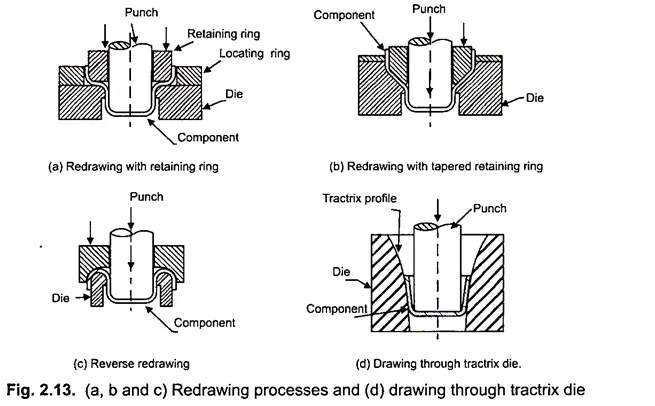
Figures 2.13(a, b and c) show three methods of redrawing of cups. Figures 2.13(a) and (b) show redrawing with the help of retaining rings. Figure 2.13(c) illustrates reverse redrawing in which case the cup is place upside down with bottom at the top and diameter is reduced by drawing into a die with help of a smaller diameter punch.
The Figure 2.13(d) shows the drawing process through a tractrix die. Tractrix curve is a special profile in which radius of curvature continuously increases. This method has the advantage that no blank holder plate is used, however, it can only be used for drawing relatively thicker sheets.
In these processes the predominant forces under which the plastic state is reached are tensile. The examples are stretch forming, expanding (bulging) with the help of hydraulic pressure or rubber pad (Fig. 2.14).
Figure 2.14(a) shows the process of stretch forming of sheet. The ends of sheet are pulled while a die is pressed against the sheet surface. The sheet is plastically deformed to the curved form of the die.
Figure 2.14(b) illustrates forming of tubular work piece with the help of hydraulic pressure and an axial force. The axial force facilitates the flow of metal into the die cavity. Figure 2.14(c) shows another example of forming with the help of hydraulic pressure. In this process an elastomer pad separates the hydraulic fluid from coming in contact with the work piece. The sheet gets pressed on to the die and gets formed to the die shape.
Figure 2.14(d) illustrates the Erichsen Cupping Test which is carried out to determine the deep draw ability of sheet metal. In this test, the sheet is firmly clamped between the two annular flat work-piece holding dies and a spherical punch is pressed on to the sheet at its center with the help of nut and screw arrangement. The punch deforms the sheet metal into a dome shape.
The process introduces a bi-axial state of stress in the sheet metal. With further pressing of the punch a neck formation may occur in the sheet and a crack may appear on the outer surface of the sheet. The process is then stopped, the work piece is taken out and dome height is measured. The dome height is taken as a measure of formability in biaxial stress state.
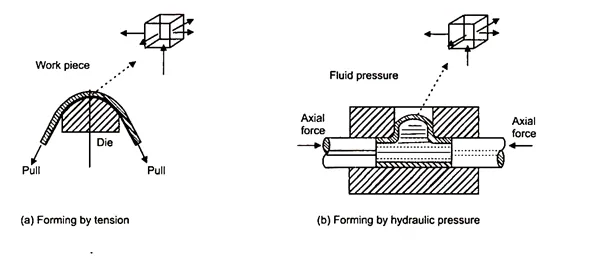
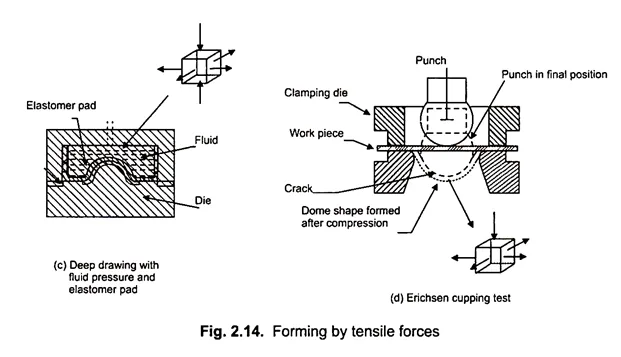
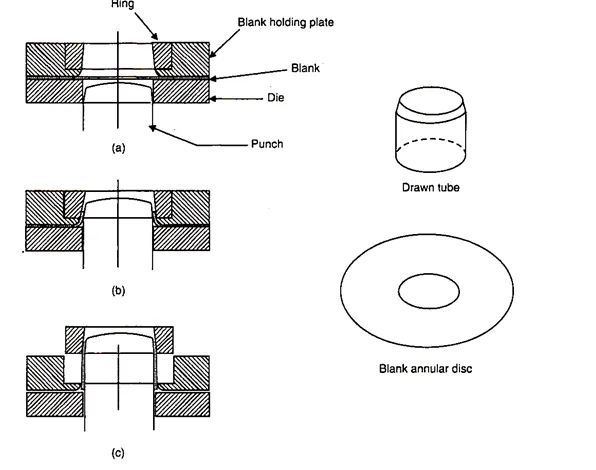
Figure 2.15 shows the process of drawing tubular component from an annular sheet disc. The process was developed by Juneja. The process takes place in two distinct phases. In the first phase the flanging takes place. In the second phase the flange is gripped between the tapered end of the punch and a ring with tapered inner surface and is pulled up. The gripping takes place automatically. The remaining sheet in flat flange is drawn out in the form of a tube.
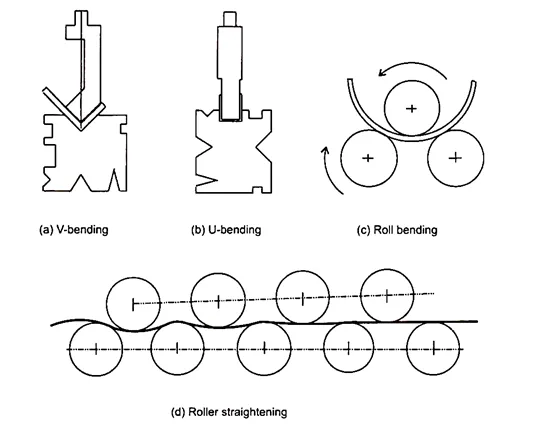
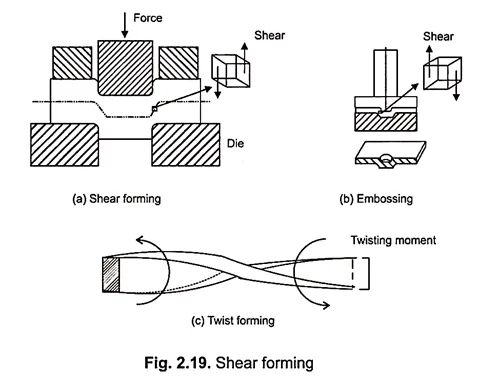
In these processes components are formed by bending. The bending equipment is designed according to the shape of component to be produced. The examples are illustrated in Fig. 2.16. Pieces of sheet or strips are bent in V-shaped or U-shaped tools (Fig. 2.16(a, b)).
For making cylindrical shape, the sheet or plate is bent between three rolls in a roll bending machine, Fig. 2.16(c). The top roll is successively pressed down between the other two rolls to increase curvature. The process is used to manufacture drums, welded and riveted pressure vessels etc.
The process of roller-straightening of strips also involves bending in either directions with decreasing intensity in successive pairs of rolls (Fig. 2.16 d) till the strip is flat. Figure 2.16(e) shows pipe bending. During unaided bending of pipes and tubes the circular shape is flattened out. In order to maintain the shape circular a mandrel has to be used. The mandrel remains at the point where bending is taking place and slides out as the bend proceeds.
The equipment of (Fig. 2.16(e)) shows a pulley with circular groove to which the pipe is clamped. A bending bar keeps the bar pressed in the circular groove. As the pulley is rotated it pulls the pipe over a fixed mandrel while the bending bar applies the required bending force.
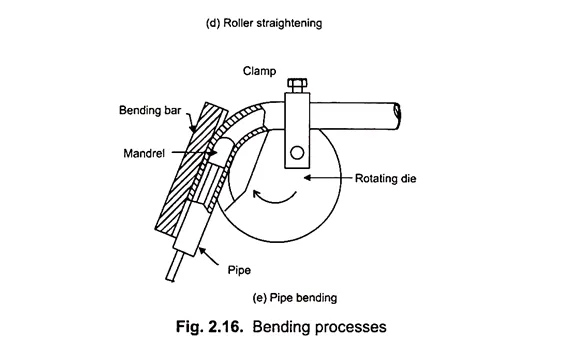
Another example of forming by bending is the manufacture of welded tubes. Strip is continuously bent by roller dies to make the tubular form which is then seam welded with the help of rotating circular electrodes (Fig. 2.17). Welded tubes may also be manufactured by bending a heated strip into circular shape by drawing through conical dies followed by forge- welding the edges.
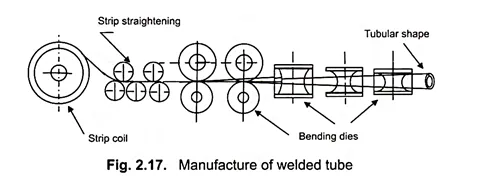
Figure 2.18 shows the types of stresses developed during bending of a strip or bar. The inner layers suffer compressive stresses while the outer layers suffer tensile stresses. The outer most layers both on inner and outer surfaces suffer the maximum stresses and hence are the first to reach plastic state. As the bending progresses the layers below the surface successively become plastic.
Even in a severe bend some layers near the neutral axis may remain in elastic condition. When the bending forces are removed, the elastic recovery takes place and there is redistribution of stresses in the cross section, consequently, the component unbends by a small angle which is called spring back angle.
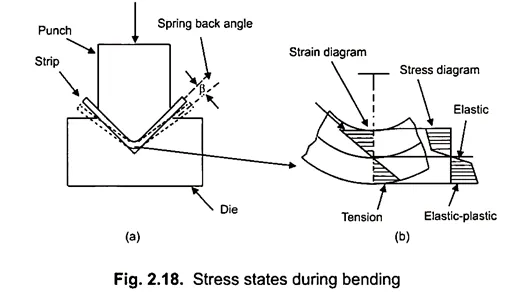
There are only a few processes in this category. Examples of these processes are shear forming (Fig. 2.19 a), embossing (Fig. 2.19 b) and twist forming (Fig. 2.19 c) etc.
Spinning and Flow Turning:
These two processes involve both shear forming and bending, Spinning, illustrated in Fig. 2.20, may be carried out manually or on fully automatic NC or CNC spinning machines.
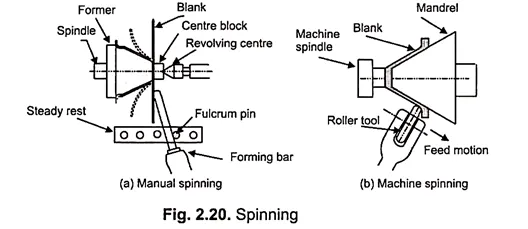
A number of components like antenna dishes, nose-cones of rockets and missiles, tumblers and other similar components are manufactured by spinning.
In manual spinning the sheet is formed with the help of a forming bar with which the sheet is pressed on to a former which may be made of wood or aluminum. In manual spinning the component thickness is not uniform. On NC/CNC spinning machines, however, identical components with close dimensional tolerances may be obtained.
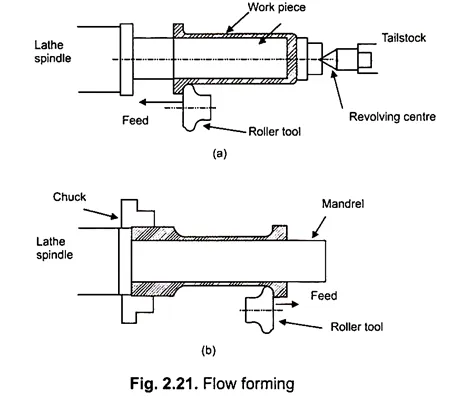
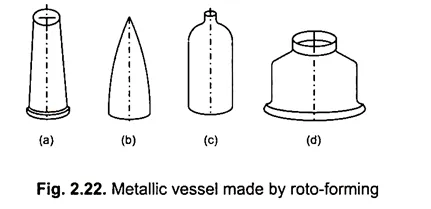
Flow forming (Fig. 2.21), also called roto-forming is generally used to make ultra-thin metallic tubes, conical components and metallic vessels (Fig. 2.22).
Forming of metals at temperatures just above the solidus line but below liquid us is being developed and is called forming in mashy state. The structure at that temperature mainly consists of grains floating in liquid matrix. The main benefit of forming at that temperature is that extremely low forces are required. Figure 2.31 shows that just above the solidus line there is steep drop of flow stress.

The process may be used in forging and extrusion. Fukuoka et al., have successfully carried out extrusion of Al-Cu alloy in mashy state. Lapkowski has obtained highly encouraging results in forging Zn alloy in the mashy state. He obtained component properties as good as obtained in normal forging. It is worthwhile to do more research in this area.
The main advantages of extrusion in mashy state are as below:
(i) The extrusion force decreases with decrease in the solid fraction but the decrease is less than the decrease in yield strength.
(ii) The extrusion force in mashy state is not affected by die angle.
(iii) Extrusion ratio as high as 1600 could be achieved.
(iv) Thin products can be easily made from big ingots.
(v) The product properties may be slightly inferior to that formed from 100% solid bar but are superior to cast products.
2. Forming by Laser Beam/Plasma Arc:
Forming by laser is an important process because it can be used for fabrication in outer space. The process involves several cycles of heating and cooling (Fig. 2.32). In each cycle the sheet is bent through a small angle. A laser beam or plasma arc is traversed on the top surface of sheet along a line on its entire width while the bottom surface is cooled by a water jet.
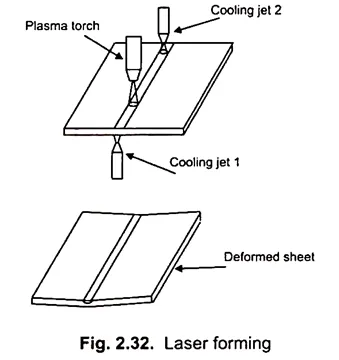
The laser beam heats the material in a narrow band on the top surface. Since bottom layer is still at a low temperature, the material in the heated band expands and suffers plastic deformation.
On subsequent cooling by the jet, the contraction of heated metal bends the sheet towards the heat source through a small angle. Several repeats of the cycle are required to get the desired angle of bend and accuracy. The properties of metal at the bend are not much affected by multiple heating and cooling.
3. Die-less Forming of Sheet Metal:
The method consists of incremental forming with the help of general purpose ball or roller ended tools similar to those used in spinning. The difference is that in spinning only axi- symmetric components can be made while in this method a large variety of circular and non- circular shapes may be generated.
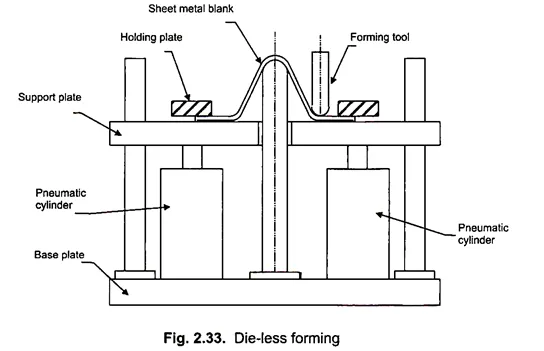
The experimental rig of the process, shown in Fig. 2.33, may be mounted on the table of an NC/CNC machine. The periphery of the sheet is fixed with the help of an annular upper disc on to the support plate. A fixed tool of the shape of a bar is fixed at the center. The sheet along with the supporting frame is pushed down against the fixed tool with the help of pneumatic cylinders.
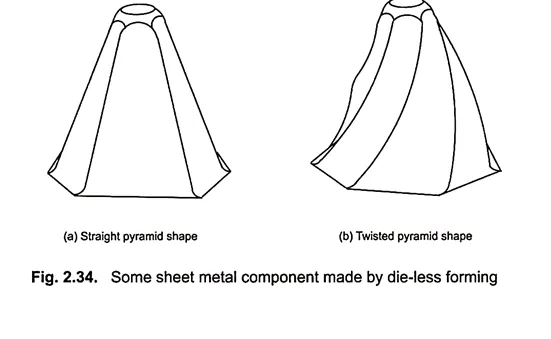
A forming tool having hemispherical end is fixed to the spindle of the machine and for forming it is pressed and moved around the fixed tool in a specified path determined by the program fed to NC/CNC machine. Conical or prismatic horns like shapes as illustrated in Fig. (2.34) may be generated.
