Introduction to measurement
Measurement techniques have been of immense importance ever since the start of human civilization, when measurements were first needed to regulate the transfer of goods in barter trade to ensure that exchanges were fair. The industrial revolution during the nineteenth century brought about a rapid development of new instruments and measurement techniques to satisfy the needs of industrialized production techniques. Since that time, there has been a large and rapid growth in new industrial technology. This has been particularly evident during the last part of the twentieth century, encouraged by developments in electronics in general and computers in particular. This, in turn, has required a parallel growth in new instruments and measurement techniques. The massive growth in the application of computers to industrial process control and monitoring tasks has spawned a parallel growth in the requirement for instruments to measure, record and control process variables. As modern production techniques dictate working to tighter and tighter accuracy limits, and as economic forces limiting production costs become more severe, so the requirement for instruments to be both accurate and cheap becomes ever harder to satisfy. This latter problem is at the focal point of the research and development efforts of all instrument manufacturers. In the past few years, the most cost-effective means of improving instrument accuracy has been found in many cases to be the inclusion of digital computing power within instruments themselves. These intelligent instruments therefore feature prominently in current instrument manufacturers’ catalogues.
Measurement units
The very first measurement units were those used in barter trade to quantify the amounts being exchanged and to establish clear rules about the relative values of different commodities. Such early systems of measurement were based on whatever was available as a measuring unit. For purposes of measuring length, the human torso was a convenient tool, and gave us units of the hand, the foot and the cubit. Although generally adequate for barter trade systems, such measurement units are of course imprecise, varying as they do from one person to the next. Therefore, there has been a progressive movement towards measurement units that are defined much more accurately.
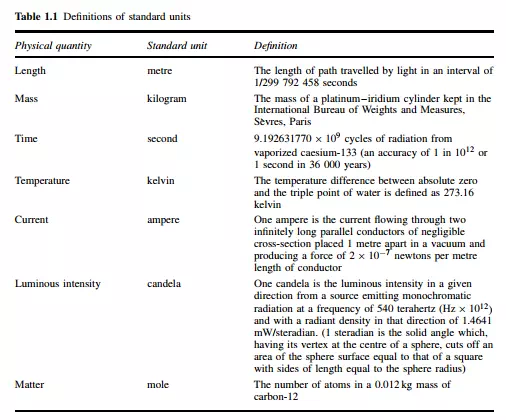
The first improved measurement unit was a unit of length (the metre) defined as 107 times the polar quadrant of the earth. A platinum bar made to this length was established as a standard of length in the early part of the nineteenth century. This was superseded by a superior quality standard bar in 1889, manufactured from a platinum–iridium alloy. Since that time, technological research has enabled further improvements to be made in the standard used for defining length. Firstly, in 1960, a standard metre was redefined in terms of 1.65076373 ð 106 wavelengths of the radiation from krypton-86 in vacuum. More recently, in 1983, the metre was redefined yet again as the length of path travelled by light in an interval of 1/299 792 458 seconds. In a similar fashion, standard units for the measurement of other physical quantities have been defined and progressively improved over the years. The latest standards for defining the units used for measuring a range of physical variables are given in Table 1.1.
The early establishment of standards for the measurement of physical quantities proceeded in several countries at broadly parallel times, and in consequence, several sets of units emerged for measuring the same physical variable. For instance, length can be measured in yards, metres, or several other units. Apart from the major units of length, subdivisions of standard units exist such as feet, inches, centimetres and millimetres, with a fixed relationship between each fundamental unit and its subdivisions.
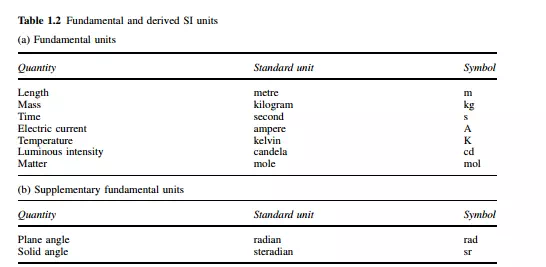
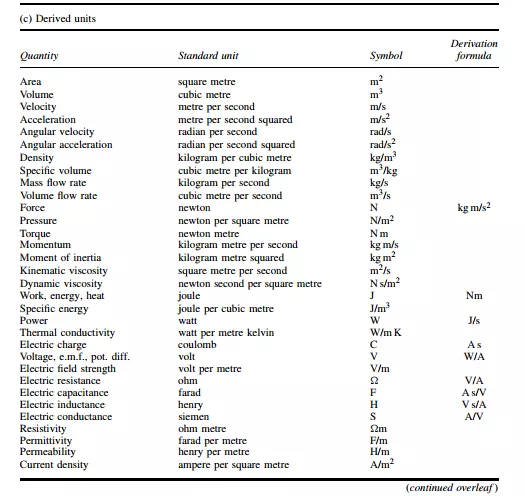
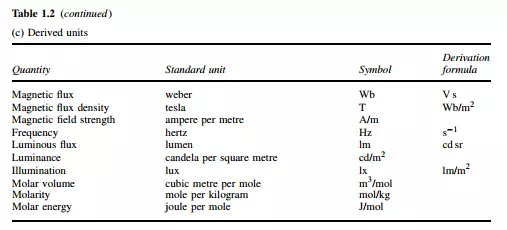
Yards, feet and inches belong to the Imperial System of units, which is characterized by having varying and cumbersome multiplication factors relating fundamental units to subdivisions such as 1760 (miles to yards), 3 (yards to feet) and 12 (feet to inches). The metric system is an alternative set of units, which includes for instance the unit of the metre and its centimetre and millimetre subdivisions for measuring length. All multiples and subdivisions of basic metric units are related to the base by factors of ten and such units are therefore much easier to use than Imperial units. However, in the case of derived units such as velocity, the number of alternative ways in which these can be expressed in the metric system can lead to confusion. As a result of this, an internationally agreed set of standard units (SI units or Systemes Internationales d’Unit ` es) has been defined, and strong efforts are being made ´ to encourage the adoption of this system throughout the world. In support of this effort, the SI system of units will be used exclusively in this book. However, it should be noted that the Imperial system is still widely used, particularly in America and Britain. The European Union has just deferred planned legislation to ban the use of Imperial units in Europe in the near future, and the latest proposal is to introduce such legislation to take effect from the year 2010. The full range of fundamental SI measuring units and the further set of units derived from them are given in Table 1.2. Conversion tables relating common Imperial and metric units to their equivalent SI units can also be found in Appendix 1.
Measurement system applications
Today, the techniques of measurement are of immense importance in most facets of human civilization. Present-day applications of measuring instruments can be classified into three major areas. The first of these is their use in regulating trade, applying instruments that measure physical quantities such as length, volume and mass in terms of standard units. The particular instruments and transducers employed in such applications are included in the general description of instruments presented in Part 2 of this book. The second application area of measuring instruments is in monitoring functions. These provide information that enables human beings to take some prescribed action accordingly. The gardener uses a thermometer to determine whether he should turn the heat on in his greenhouse or open the windows if it is too hot. Regular study of a barometer allows us to decide whether we should take our umbrellas if we are planning to go out for a few hours. Whilst there are thus many uses of instrumentation in our normal domestic lives, the majority of monitoring functions exist to provide the information necessary to allow a human being to control some industrial operation or process. In a chemical process for instance, the progress of chemical reactions is indicated by the measurement of temperatures and pressures at various points, and such measurements allow the operator to take correct decisions regarding the electrical supply to heaters, cooling water flows, valve positions etc. One other important use of monitoring instruments is in calibrating the instruments used in the automatic process control systems described below.
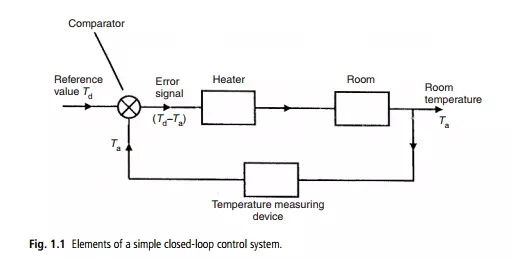
Use as part of automatic feedback control systems forms the third application area of measurement systems. Figure 1.1 shows a functional block diagram of a simple temperature control system in which the temperature Ta of a room is maintained at a reference value Td. The value of the controlled variable Ta, as determined by a temperature-measuring device, is compared with the reference value Td, and the difference e is applied as an error signal to the heater. The heater then modifies the room temperature until Ta D Td. The characteristics of the measuring instruments used in any feedback control system are of fundamental importance to the quality of control achieved. The accuracy and resolution with which an output variable of a process is controlled can never be better than the accuracy and resolution of the measuring instruments used. This is a very important principle, but one that is often inadequately discussed in many texts on automatic control systems. Such texts explore the theoretical aspects of control system design in considerable depth, but fail to give sufficient emphasis to the fact that all gain and phase margin performance calculations etc. are entirely dependent on the quality of the process measurements obtained.
Elements of a measurement system
A measuring system exists to provide information about the physical value of some variable being measured. In simple cases, the system can consist of only a single unit that gives an output reading or signal according to the magnitude of the unknown variable applied to it. However, in more complex measurement situations, a measuring system consists of several separate elements as shown in Figure 1.2. These components might be contained within one or more boxes, and the boxes holding individual measurement elements might be either close together or physically separate. The term measuring instrument is commonly used to describe a measurement system, whether it contains only one or many elements, and this term will be widely used throughout this text. The first element in any measuring system is the primary sensor: this gives an output that is a function of the measurand (the input applied to it). For most but not all sensors, this function is at least approximately linear. Some examples of primary sensors are a liquid-in-glass thermometer, a thermocouple and a strain gauge. In the case of the mercury-in-glass thermometer, the output reading is given in terms of the level of the mercury, and so this particular primary sensor is also a complete measurement system in itself. However, in general, the primary sensor is only part of a measurement system. The types of primary sensors available for measuring a wide range of physical quantities are presented in Part 2 of this book.
Variable conversion elements are needed where the output variable of a primary transducer is in an inconvenient form and has to be converted to a more convenient form. For instance, the displacement-measuring strain gauge has an output in the form of a varying resistance. The resistance change cannot be easily measured and so it is converted to a change in voltage by a bridge circuit, which is a typical example of a variable conversion element. In some cases, the primary sensor and variable conversion element are combined, and the combination is known as a transducer. Signal processing elements exist to improve the quality of the output of a measurement system in some way. A very common type of signal processing element is the electronic amplifier, which amplifies the output of the primary transducer or variable conversion element, thus improving the sensitivity and resolution of measurement. This element of a measuring system is particularly important where the primary transducer has a low output. For example, thermocouples have a typical output of only a few millivolts. Other types of signal processing element are those that filter out induced noise and remove mean levels etc. In some devices, signal processing is incorporated into a transducer, which is then known as a transmitter.
In addition to these three components just mentioned, some measurement systems have one or two other components, firstly to transmit the signal to some remote point and secondly to display or record the signal if it is not fed automatically into a feedback control system. Signal transmission is needed when the observation or application point of the output of a measurement system is some distance away from the site of the primary transducer. Sometimes, this separation is made solely for purposes of convenience, but more often it follows from the physical inaccessibility or environmental unsuitability of the site of the primary transducer for mounting the signal
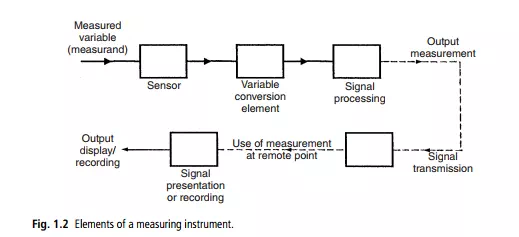
presentation/recording unit. The signal transmission element has traditionally consisted of single or multi-cored cable, which is often screened to minimize signal corruption by induced electrical noise. However, fibre-optic cables are being used in ever increasing numbers in modern installations, in part because of their low transmission loss and imperviousness to the effects of electrical and magnetic fields. The final optional element in a measurement system is the point where the measured signal is utilized. In some cases, this element is omitted altogether because the measurement is used as part of an automatic control scheme, and the transmitted signal is fed directly into the control system. In other cases, this element in the measurement system takes the form either of a signal presentation unit or of a signal-recording unit. These take many forms according to the requirements of the particular measurement application, and the range of possible units is discussed more fully in Chapter 11.
Choosing appropriate measuring instruments
The starting point in choosing the most suitable instrument to use for measurement of a particular quantity in a manufacturing plant or other system is the specification of the instrument characteristics required, especially parameters like the desired measurement accuracy, resolution, sensitivity and dynamic performance (see next chapter for definitions of these). It is also essential to know the environmental conditions that the instrument will be subjected to, as some conditions will immediately either eliminate the possibility of using certain types of instrument or else will create a requirement for expensive protection of the instrument. It should also be noted that protection reduces the performance of some instruments, especially in terms of their dynamic characteristics (for example, sheaths protecting thermocouples and resistance thermometers reduce their speed of response). Provision of this type of information usually requires the expert knowledge of personnel who are intimately acquainted with the operation of the manufacturing plant or system in question. Then, a skilled instrument engineer, having knowledge of all the instruments that are available for measuring the quantity in question, will be able to evaluate the possible list of instruments in terms of their accuracy, cost and suitability for the environmental conditions and thus choose the most appropriate instrument. As far as possible, measurement systems and instruments should be chosen that are as insensitive as possible to the operating environment, although this requirement is often difficult to meet because of cost and other performance considerations. The extent to which the measured system will be disturbed during the measuring process is another important factor in instrument choice. For example, significant pressure loss can be caused to the measured system in some techniques of flow measurement.
Published literature is of considerable help in the choice of a suitable instrument for a particular measurement situation. Many books are available that give valuable assistance in the necessary evaluation by providing lists and data about all the instruments available for measuring a range of physical quantities (e.g. Part 2 of this text). However, new techniques and instruments are being developed all the time, and therefore a good instrumentation engineer must keep abreast of the latest developments by reading the appropriate technical journals regularly. The instrument characteristics discussed in the next chapter are the features that form the technical basis for a comparison between the relative merits of different instruments. Generally, the better the characteristics, the higher the cost. However, in comparing the cost and relative suitability of different instruments for a particular measurement situation, considerations of durability, maintainability and constancy of performance are also very important because the instrument chosen will often have to be capable of operating for long periods without performance degradation and a requirement for costly maintenance. In consequence of this, the initial cost of an instrument often has a low weighting in the evaluation exercise.
Cost is very strongly correlated with the performance of an instrument, as measured by its static characteristics. Increasing the accuracy or resolution of an instrument, for example, can only be done at a penalty of increasing its manufacturing cost. Instrument choice therefore proceeds by specifying the minimum characteristics required by a measurement situation and then searching manufacturers’ catalogues to find an instrument whose characteristics match those required. To select an instrument with characteristics superior to those required would only mean paying more than necessary for a level of performance greater than that needed. As well as purchase cost, other important factors in the assessment exercise are instrument durability and the maintenance requirements. Assuming that one had £10 000 to spend, one would not spend £8000 on a new motor car whose projected life was five years if a car of equivalent specification with a projected life of ten years was available for £10 000. Likewise, durability is an important consideration in the choice of instruments. The projected life of instruments often depends on the conditions in which the instrument will have to operate. Maintenance requirements must also be taken into account, as they also have cost implications.
As a general rule, a good assessment criterion is obtained if the total purchase cost and estimated maintenance costs of an instrument over its life are divided by the period of its expected life. The figure obtained is thus a cost per year. However, this rule becomes modified where instruments are being installed on a process whose life is expected to be limited, perhaps in the manufacture of a particular model of car. Then, the total costs can only be divided by the period of time that an instrument is expected to be used for, unless an alternative use for the instrument is envisaged at the end of this period.
To summarize therefore, instrument choice is a compromise between performance characteristics, ruggedness and durability, maintenance requirements and purchase cost. To carry out such an evaluation properly, the instrument engineer must have a wide knowledge of the range of instruments available for measuring particular physical quantities, and he/she must also have a deep understanding of how instrument characteristics are affected by particular measurement situations and operating conditions.