Calibration of Measurements
We have already introduced the concept of accuracy in making a measurement and how the uncertainty inherent in all measurements must be kept sufficiently small. The process and apparatus used to find out if a measurement is accurate enough is called calibration. It is achieved by comparing the result of a measurement with a method possessing a measurement performance that is generally agreed to have less uncertainty than that in the result obtained. The error arising within the calibration apparatus and process


of comparison must necessarily be less than that required. This means that calibration is often an expensive process. Conducting a good calibration requires specialist expertise.
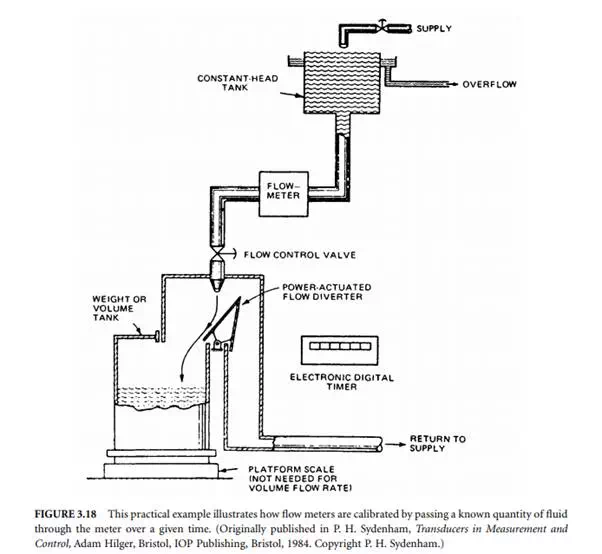
The method and apparatus for performing measurement instrumentation calibrations vary widely. An illustrative example of the comparison concept underlying them all is given in the calibration of flow meters, shown diagrammatically in Figure 3.18.
By the use of an overflowing vessel, the top tank provides a flow of water that remains constant because it comes from a constant height. The meter to be calibrated is placed in the downstream pipe.
The downstream is either deflected into the weigh tank or back to the supply. To make a measurement, the water is first set to flow to the supply. At the start of a test period, the water is rapidly and precisely deflected into the tank. After a given period, the water is again sent back to the supply. This then has filled the tank with a given amount of water for a given time period of flow. Calculations are then undertaken to work out the quantity of water flowing per unit time period, which is the flow rate. The meter was already registering a flow rate as a constant value. This is then compared with the weighed method to yield the error. Some thought will soon reveal many sources of error in the test apparatus, such as that the temperature of the water decides the volume that flows through and thus this must be allowed for in the calculations.
It will also be clear that this calibration may not be carried out under the same conditions as the measurements are normally used. The art and science and difficulties inherent in carrying out quality calibration for temperature sensors are well exposed [2].
Calibration of instrumentation is a must for, without it, measurement results may be misleading and lead to costly aftermath situations. Conducting good calibration adds overhead cost to measurement but it is akin to taking out insurance. If that investment is made properly, it will assist in mitigating later penalties. For example, an incorrectly calibrated automatic cement batcher was used in making concrete for the structural frame of a multistory building. It took several days before concrete strength tests revealed the batcher had been out of calibration for a day with the result that the concrete already poured for three floors was not of adequate strength. By then, more stories had been poured on top. The defective floors had to be fully replaced at great cost. More resource put into the calibration process would have ensured that the batcher was working properly