Descriptions of the Relatively Mature Measuring Techniques
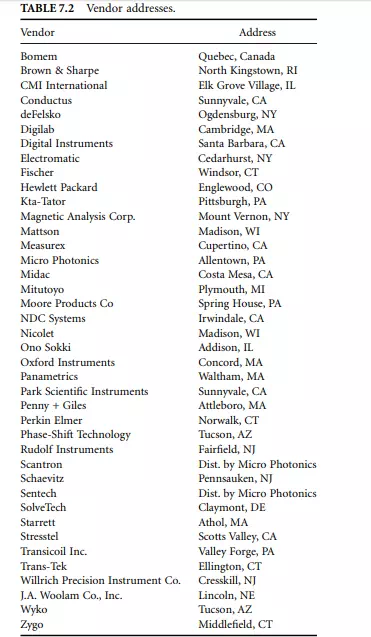
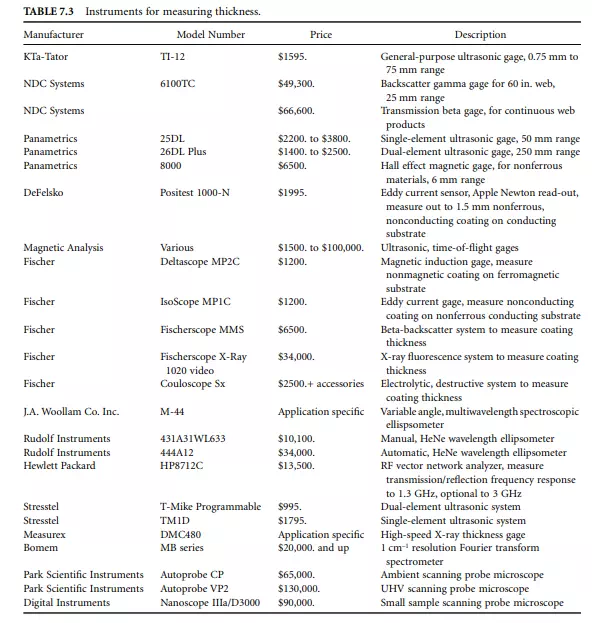
The following descriptions will also refer to some of the relevant vendors, whose addresses are found in Table 7.2. Additional vendor information, with specific price or model number identification, is found in Table 7.3. The words “gage” and “gauge” are used interchangeably.
Mechanical
The fundamental tool for measuring thickness is the line-graduated instrument [1, 2]. It is the only mechanical means to make direct measurements. Graduated spacings that represent known distances are used as direct comparisons to the unknown distance. Instruments include bars, rules, and tapes generically called rulers; caliper gages, which employ a positive contact device for improved alignment of the distance boundaries; and micrometers, which typically have greater precision due to a combination of linear and circumferential scales. Caliper precision can be improved with vernier scales or linear transducers. Fixed gages are often used to measure objects on a pass/fail basis. An object of fixed geometry (length, tapered bore, thread, etc.) is compared to a test piece typically for part inspection. Variations include the master gage, an object used to represent the nominal dimension of the part; the limit gage, an object used to represent the limit condition for tolerance dimensioning; and gage blocks or Johansson blocks, an object of fixed length used as a dimensional reference standard. Dial indicators are used to sense displacement

from a reference plane and display the deviation thereof. The display can be electronically coupled for amplification and/or display purposes. The range of a measuring instrument may be extended if multiple copies of the object to be measured are available. For example, the thickness of a sheet of paper may be measured by a simple ruler if 500 sheets of paper are stacked. (Vendors: Brown & Sharpe, Starrett, Mitutoyo. Also see [3].)
Electronic Gages
A Linear Variable Differential Transformer (LVDT), utilizes multiple toroidal transformers to sense axial displacement of an iron core that is attached to a measuring contact, either directly or by another joint (such as a lever). The displacement has a direct correlation to the distance that other electronics display. Thus, the LVDT serves as a replacement for a lined ruler or micrometer, incorporating an electrical readout. (Vendors: Penny + Giles; Schaevitz; Transicoil Inc.; Trans-Tek.)
