Bonded Strain Gauges
These gauges are directly bonded (that is pasted) on the surface of the structure under study. Hence they are termed as bonded strain gauges. The three types of bonded strain gauges are
1. Fine wire strain gauge
2. Metal foil strain gauge
3. Semi-conductor gauge
Fine wire strain gauge
This is the first type of Bonded Strain Gauges.
Description
The arrangement consists of following parts,
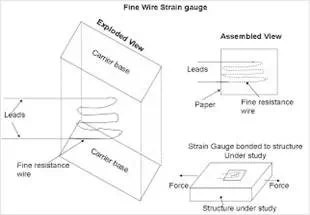
A fine resistance wire diameter 0.025 mm which is bent again and again as shown in diagram. This is done to increase the length of the wire so that it permits a uniform distribution of stress. This resistance wire is placed between the two carrier bases (paper, Bakelite or Teflon) which are cemented to each other. The carrier base protects the gauge from damages. Leads are provided for electrically connecting the strain gauge to a measuring instrument (Wheatstone bridge).

Operation
With the help of an adhesive material, the strain gauge is pasted/bonded on the structure under study. Now the structure is subjected to a force (tensile or compressive). Due to the force, the structure will change the dimension. As the strain gauge is bonded to the structure, the strain gauge will also undergo change in both in length and cross-section (that is, it strained). This strain (change in dimension) changes the resistance of the strain gauge which can be measured using a wheatstone bridge. This change in resistance of the strain gauge becomes a measure of the extent to which the structure is strained and a measure of the applied force when calibrated.
Fine Wire strain gauge Materials
Material Composition
Nichrome Ni - 80% ; Cr – 20%
Constantan Ni – 45%; Cu – 55%
Nickel ----
Platinum ----
Isoelastic Ni – 36%; Cr – 8%; Mo – 0.5%
Advantages of Fine Wire Strain Gauge
The range of this gauge is +/- 0.3% of strain.
This gauge has a high accuracy.
Has a linearity of +/- 1%.
Limitation of Fine Wire strain gauge
● These gauges cannot be detached and used again (because the gauges are bonded to the structure).
● These gauges are costly.
Metal Foil Strain Gauge
Description of Metal Foil Strain Gauge
The arrangement consists of the following;
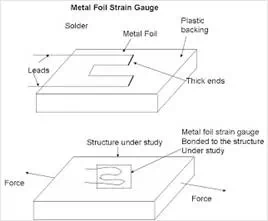
The metal foil of 0.02mm thick is produced using the printed circuit technique. This metal foil is produced on one side of the plastic backing. Leads are soldered to the metal foil for electrically connecting the strain gauge to a measuring instrument (wheatstone bridge).

Operations of Metal foil Strain gauge
With the help of an adhesive material, the strain gauge is pasted/bonded on the structure under study. Now the structure is subjected to a force (tensile or compressive). Due to the force, the structure will change the dimension. As the strain gauge is bonded to the structure, the strain gauge will also undergo change in both in length and cross-section (that is, it strained). This strain (change in dimension) changes the resistance of the strain gauge which can be measured using a wheatstone bridge. This change in resistance of the strain gauge becomes a measure of the extent to which the structure is strained and a measure of the applied force when calibrated. Same as Fine Wire strain gauge operation.
Advantages of Metal foil Strain gauge
● These strain gauges can be manufactured in any shape.
● Perfect bonding of the strain gauge is possible with structure under study.
● The backing can be peeled off and the metal foil with leads can be used directly on the structure under study. In such cases, a ceramic adhesive is to be used.
● These gauges have a better fatigue life.
● Has good sensitivity and have stability even at high temperatures.
Semi – conductor or Piezo Resistive Strain Gauge
Description of Piezo Resistive Strain Gauge.
The arrangement of a semiconductor strain gauge is as follows:
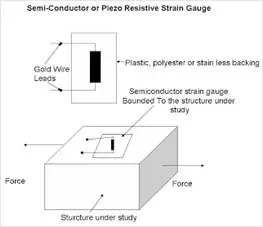
The sensing element is rectangular filament made as a wafer from silicon or germanium crystals. To these crystals, boron is added to get some desired properties and this process is called doping and the crystals are called doped crystals. This sensing element is attached to a plastics or stainless steel backing. Leads made of gold are drawn out from the sensing element for electrically connecting the strain gauge to a measuring instrument (wheatstone bridge).
There are two types of sensing element namely:
● Negative or n-type (resistance decrease with respect to tensile strain).
● Positive or P-type ( resistance increase with respect to tensile strain).

Operation
With the help of an adhesive material, the strain gauge is pasted/bonded on the structure under study. Now the structure is subjected to a force (tensile or compressive). Due to the force, the structure will change the dimension. As the strain gauge is bonded to the structure, the strain gauge will also undergo change in both in length and cross-section (that is, it strained). When the sensing element (crystal) of the semiconductor strain gauge is strained, its resistivity changes contributing to a change in the resistance of the strain gauge. The change in the resistance of the strain gauge is measured using a wheatstone bridge. . This change in resistance of the strain gauge becomes a measure of the extent to which the structure is strained and a measure of the applied force when calibrated.
Advantages of semi-conductor Strain gauges
● These gauges have high gauge factor and hence they can measure very small strains.
● They can be manufactured to very small sizes.
● They have an accuracy of 2.3%
● They have excellent hysteresis characteristics.
● They have a good frequency of response.
● They have good fatigue life.
Limitation of semi-conductor Strain gauges
● These gauges are brittle and hence they cannot be used for measuring large strain.
● The gauge factor is not constant.
● These gauges have poor linearity.
● These gauges are very costly and are difficult to be bonded onto the structure under study.
● These gauges are sensitive to change in temperature.