Booting The Computer
The process used to start up a PC each time it is powered on is called the boot process. While it sounds like it could refer to kick-starting, this term is actually derived from the saying, “Pulling one’s self upby one’s own bootstraps,” which is a long-winded way of saying you are a self-starter. PCs are self-starters in the respect that when you flick on the power switch, the PC verifies its hardware configuration, runs a few function tests, and then gets its operating system loaded into memory and running on the CPU. It’s almost like magic…well, not quite.
The boot process is performed under the guidance of the BIOS. The BIOS contains the instructions needed to verify, test, and start the PC—in other words, boot the computer. When the computer boots up, the BIOS is behind the scenes causing and managing the actions that are taking place. The PC’s hardware cannot perform independent actions. It must have instructions to do anything at all. These instructions are in the form of the PC’s software, which are blocks of instructions that guide the hardware to perform specific activities.
System Boot Sequence
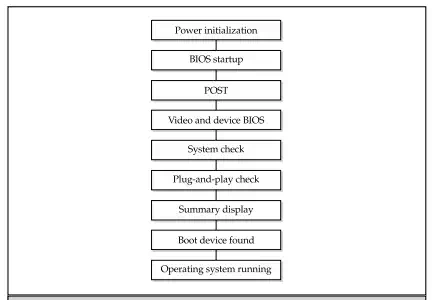
The most important action of the BIOS is to boot the PC. The process used to do this is actually a fairly complex sequence of steps that verifies the configuration, checks the hardware, and loads the software. The actual steps included in a particular BIOS’ boot sequence can vary by manufacturer, but the following are typical of the steps normally performed during the system boot sequence (reference Figure 6-2 as you go through the boot sequence steps):
1. When you turn on the PC’s power switch, the internal power supply initializes itself. As I will discuss in Chapter 14, the power supply does not provide power to the rest of the PC immediately. As soon as the power supply is able to supply reliable power to the motherboard, it transmits a “good power” signal to the motherboard’s chipset (see Figure 6-2), which sends a system reset command to the processor (step 2 in Figure 6-2). At this point, from all outward appearances, the PC looks as if it is still powered off.
2. The system reset command sent by the motherboard’s chipset causes the CPU to read its first instruction from what is called the jumpaddress (step3 in Figure 6-2). The jump address is always located in a fixed preset location, typically address FFFF0h in system memory. The jump address contains the physical address of the BIOS’ boot program on the ROM BIOS chip (see “ROMs, PROMs, and EPROMs: BIOS Chips” later in the chapter for more information on the ROM BIOS).
3. The CPU executes the first instruction, which copies the BIOS programs into system memory (steps 4 and 5 on Figure 6-2) and starts the BIOS running.
4. The BIOS next performs the POST (Power-On Self-Test) process (see “The POST Process” later in this section). The POST verifies and tests the hardware configuration stored in the BIOS configuration information. Should the POST detect any problems, it sounds beep codes, one or more beeps through the system speaker to indicate the nature of the problem, or displays an error message (see “BIOS Beep Codes” later in this section), and the boot process stops.
5. If the POST finds no problems, the boot process continues. At this point, the system BIOS (the one booting the PC) looks for the video adapter’s BIOS and starts it. Virtually all peripheral devices on the PC have their own BIOS. This is the first time, aside from the noises of the disk drives and a single beep indicating all is well, that you will know the PC is booting. Information about the video card is displayed on the monitor’s screen.
6. The display of the video adapter’s information is followed by information about the system BIOS itself. This usually includes information on the manufacturer and version of the BIOS program.
7. Any device BIOS routines are started. The video card’s BIOS starts first to turn on the display, then information about the system BIOS and the other BIOSs is displayed as they are started.
8. Next, the BIOS begins a series of tests on the system, including the amount of memory detected on the system. This test is usually displayed on the screen as a run-up counter showing the amount of memory detected and tested. Because the BIOS now has use of the monitor, it displays error messages for any problems detected instead of the beep codes that it had to use prior to the display being available.
9. With the device BIOSs loaded, the system BIOS checks if the devices listed in the CMOS configuration data (see “Complementary Metal-Oxide Semiconductor (CMOS)” later in the chapter) are present and functioning, including their speeds, access modes, and other parameters. In this sequence, the serial and parallel ports are assigned their identities (COM1, COM2, LPT1, etc.). As each device is passed, a message is displayed that it was found, configured, and tested.
10. If the BIOS supports Plug and Play (PnP) technology, any PnP devices detected are configured. Information on each PnP device is displayed on the screen, although it typically goes by much too fast to read.
11. At the end of the test and configuration sequence, the BIOS should display a summary data screen that details the PC as the BIOS sees it and indicating that the system is verified and ready for use. Only one thing is missing…
12. To start the operating system running, the BIOS must first find it. Included in the CMOS data is a parameter that indicates the disk drives (floppy, hard, or CD-ROM) and the order in which they should be accessed to find the operating system. In most cases, the boot sequence parameters will be set to look for the operating system on first the floppy disk drive, then the hard disk drive, and perhaps, if all else fails, the CD-ROM drive. This sequence can be changed to reflect the sequence desired. If the first boot device is the hard disk, the BIOS looks for the master boot record (MBR) to use to start the operating system. If the boot disk is a floppy disk, the BIOS looks at the first sector of the disk for the OS boot program. If the boot program is not found on the first device listed, then the next device is searched and so on until the boot program is found. If no boot device is found, the boot sequence stops and an error message (“No boot device available”) is displayed.
The PC should now be upand running and ready for use. Next time you boot upa PC, watch this sequence more closely to see if you recognize the actions taking place.
Cold Boots versus Warm Boots
The boot sequence used when a PC is powered on from a powered off condition is called a cold boot. A cold boot is done when the computer is started from a cold (or completely powered off) status. A warm boot happens when the PC is already powered on. Pressing the key combination CTRL-ALT-DEL or pressing the reset button. A cold boot causes the complete boot and POST sequence to run. However, the POST process does not run after a warm boot.