Metals
Introduction
Nature and Properties of Pure Metals Metals achieve engineering importance because of their abundance, variety, and unique properties as conferred by metallic bonding. Twenty-four of the 26 most abundant elements in the Earth’s crust are metals, with only two nonmetallic elements, oxygen and silicon. The two most abundant metallic elements, iron (5.0%) and aluminum (8.1%), are also the most commonly used structural metals. Iron is the most-used metal, in part because it can frequently be extracted from its enriched ores with considerably less energy spending than aluminum, and also because of the very wide range of mechanical properties its alloys can provide. The next 15 elements in frequency include most common engineering metals and alloys: calcium (3.6%), magnesium (2.1%), titanium (0.63%), manganese (0.10), chromium (0.037%), zirconium (0.026%), nickel (0.020%), vanadium (0.017%), copper (0.010%), uranium (0.008%), tungsten (0.005%), zinc (0.004%), lead (0.002%), cobalt (0.001%), and beryllium (0.001%). The cost of metals is strongly affected by strategic abundance as well as secondary factors such as extraction/processing cost and application. Carbon steels and cast irons, iron alloys with carbon, are usually most cost-effective for ordinary mechanical applications. These alloys increase in cost with alloying additions.
A variety of metal properties are unique among materials and of importance technologically. These properties are conferred by metallic bonding. This bonding is different from other types of solids in that the electrons are free to acquire energy, and the metallic ions are relatively mobile, and quite interchangeable with regard to their positions in the crystal lattice. A crystal lattice is the three-dimensional repeating arrangement of atoms in a solid.
Metals are good conductors of heat and electricity because thermal and electrical energy can be transferred by the free electrons. These two properties tend to parallel each other. For example, the pure noble metals (e.g., copper, silver, gold and platinum) are among the best electrical and thermal conductors. As a broad generalization, metallic elements with an odd number of valence electrons tend to be better conductors than those with an even number. Thermal conductivity and electrical resistivity have a reciprocal relationship. As metals are alloyed with other elements, their electrical and thermal conductivity usually decreases significantly from that of the pure, perfect, unalloyed metal. Electrical and thermal conductivities tend to decrease proportionately to each other with increasing temperature for a specific metal. These conductivities may be altered if heating introduces metallurgical change in the crystal lattice.
Strength and Deformation, Fracture Toughness
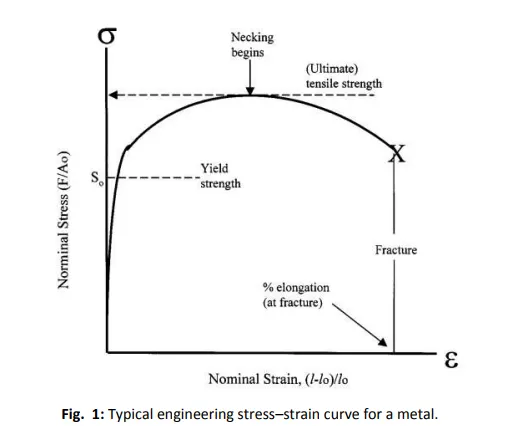
Figure 1 shows a typical stress–strain diagram for a metal. The first portion is a linear, spring-type behavior, termed elastic, and attributable to stretching of atomic bonds. The slope of the curve is the “stiffness”. The relative stiffness is low for metals as contrasted with ceramics because atomic bonding is less strong. Similarly, high-melting-point metals tend to be stiffer than those with weaker atomic bonds and lower melting behavior. The stiffness behavior is frequently given quantitatively for uniaxial loading by the simplified expressions of Hooke’s law:

Where σx is the stress (force per unit area, psi or Pa) in the x direction of applied unidirectional tensile load, εx is the strain (length per unit length or percent) in the same direction, εy and εz are the contracting strains in the lateral directions, E is Young’s modulus (the modulus of elasticity), and υ is Poisson’s ratio. As the elastic modulus (stiffness) increases with atomic bond strength, the coefficient of linear expansion tends to decrease.

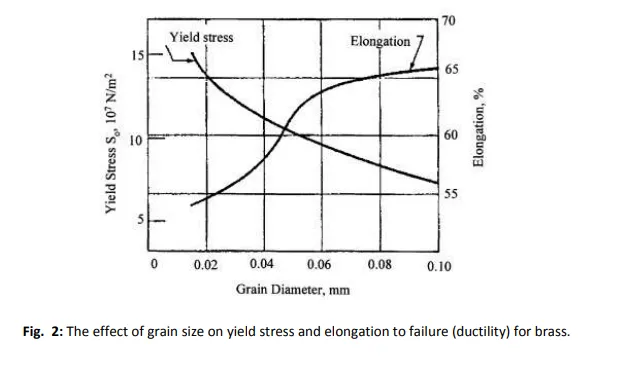
At a critical stress the metal begins to deform permanently, as seen as a break in the straight-line behavior in the stress-strain diagram of Figure 1. The stress for this onset is termed the yield stress or elastic limit. For engineering purposes it is usually taken at 0.2% plastic strain in order to provide a predictable, identifiable value. In the case of steel a small yield drop allows for clear identification of the yield stress. The onset of yield is a structure-sensitive property. It can vary over many orders of magnitude and depends on such factors as grain size and structure, phases present, degree of cold work, and secondary phases in grains or on grain boundaries as affected by the thermal and mechanical treatment of the alloy. The extension to failure, the ductility, and maximum in the stress–strain curve, the “ultimate stress” or “tensile strength” are also structure- sensitive properties. The strength and specific strength (strength-to-weight ratio) generally decrease with temperature. The ductility usually decreases as the strength (yield or ultimate) increases for a particular metal. Reduction in the grain size of the metal will usually increase yield stress while decreasing ductility (Figure 2). Either yield or ultimate strength is used for engineering design with an appropriate safety factor, although the former may be more objective because it measures the onset of permanent deformation. Ductility after yield provides safety, in that, rather than abrupt, catastrophic failure, the metal deforms

A different, independent measure is needed for impact loads — “toughness.” This is often treated in design, materials selection, and flaw evaluation by extending Griffith’s theory of critical flaw size in a brittle material:

where σf is the failure stress, Klc is a structure-sensitive materials property, the “fracture toughness” or “stress intensity factor” for a normal load, γ is a constant depending on orientation, and c is the depth of a long, narrow surface flaw or crack (or half that of an internal flaw). This is a separate design issue from that of strength. It is of particular importance when a metal shows limited ductility and catastrophic failure must be avoided. In some applications the growth of cracks, c is monitored to prevent catastrophic failure. Alternatively, sufficient energy absorption as characteristic of a metal is determined when it is fractured in a Charpy or Izod impact test.