Key Points To Remember About Projections Of Planes:
1. Plane perpendicular to one reference plane and parallel to the other (one step)
If it is parallel to the VP and perpendicular to the HP, its front view is drawn with the true shape and size and the top view is a horizontal line.
If it is parallel to the HP and perpendicular to the VP, its top view is drawn with the true shape and size and the front view is a horizontal line.
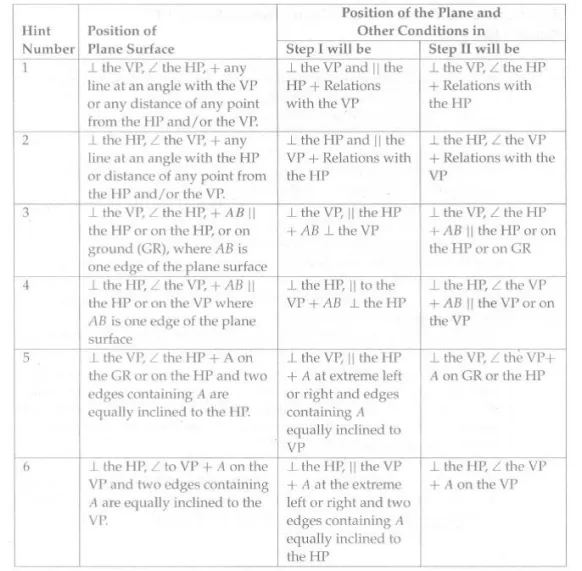
II. When a plane is perpendicular to one and inclined to the other, two steps are required to draw the projections (two steps)
Step I: If the given plane is perpendicular to the VP and inclined to the HP, assume it to be parallel to the HP in Step I. If it is perpendicular to the HP and inclined to the VP, assume it to be parallel to the VP in Step I.
Step II: Rotate the plane to make it inclined to one reference plane, as required, keeping it perpendicular to the other.
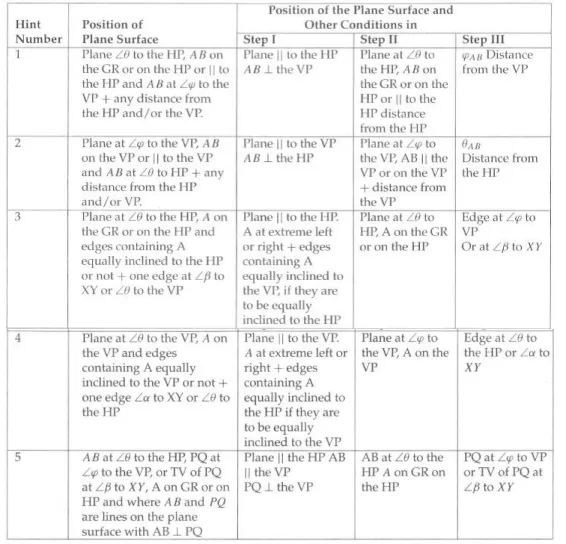
III. When a plane is inclined to both reference planes, three steps are required to draw the projections
Step I: The plate is assumed to be parallel to the VP, perpendicular to the HP, and have one of its edges, say, AI B l, perpendicular to the HP.
Step II: The plate is assumed to be inclined to the VP at an angle Φ, while remaining perpendicular to the HP. The other edge, say, A2B2 also remains perpendicular to the HP. As relations with the HP do not change, projection on the HP, that is, the top view, remains as a straight line and front views are at the same distance from XY as the corresponding points are from XY in Step 1.
Step III: The plate is assumed to be rotated so that A2B2becomes AB, inclined at e to the HP. However, none of the lines or points changes their relations with the VP. Hence, in the front view the shape does not change and the distances of various points from the XY line in the top view remain the same in Step II and Step III.
The Position Of The Plane Two Step Problem

The Position Of The Plane For Three-Step Problems:
