Creating a New C# Project
Before doing anything else in Visual Studio, we must create a new project or load an existing one. The project groups many files, designed to implement a software application or system, in a logical manner. It is recommended that we create a separate project for each new program.
We can create a project in Visual Studio by following these steps:
· File -> New Project …
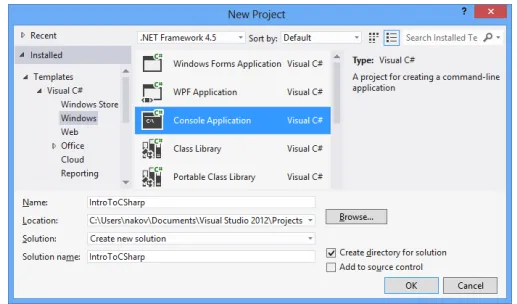
· The “New Project” dialog appears and lists all the different types of projects we can create. We can choose a project type (e.g. Console Application or WPF Application), programming language (e.g. C# or VB.NET) and .NET Framework version (e.g. .NET Framework 4.5) and give a name to our project (in our case “IntroToCSharp”)

· We choose Console Application. Console applications are programs, which use the console as a default input and output. Data is entered with the keyboard and when a result needs to be printed it appears on the console (as text on the screen in the program window). Aside from console applications, we can create applications with a graphical user interface (e.g. Windows Forms or WPF), Web applications, web services, mobile applications, Windows Store apps, database projects and others.
· In the field "Name" we enter the name of the project. In our case we choose the name IntroToCSharp.
· We press the [OK] button.
The newly created project is now shown in the Solution Explorer. Also, our first file, containing the program code, is automatically added. It is named Program.cs. It is very important to give meaningful names to our files, classes, methods and other elements of the program, so that we can easily find them and navigate the code. A meaningful name means a name that answers the question “what is the intent of this file / class / method / variable?” and helps developers to understand how the code works. Don’t use Problem3 for a name, even if you are solving the problem 3 from the exercises. Name your project / class by its purpose. If your project is well named, after few months or a year you will be able to explain what it is intended to do without opening it and looking inside. Problem3 says nothing about what this project actually does.
In order to rename the Program.cs file, we right click on it in the Solution Explorer and select "Rename". We can name the main file of our C# program HelloCSharp.cs. Renaming a file can also be done with the [F2] key when the file is selected in the Solution Explorer:


