Basic Waveform Analysis with an
Oscilloscope
Learn about
the current generation of oscilloscopes and how to use them to measure various
circuit elements.
The oscilloscope is an
invaluable diagnostic instrument that can be used to troubleshoot problem
circuits, verify product design before delivery to consumers, and
reverse-engineer products for "hacks".
We will explore the various
uses of an oscilloscope using the Tektronix MDO3104 that was provided by
Tektronix. Part 1 will show the versatility of the current generation of
oscilloscopes.
Getting a Scope
When preparing articles, we
typically provide a link to purchase the parts required from various vendors.
Due to the high cost of the machine used in this article, it seemed prudent to
find an option for readers to acquire a machine in some other manner. If you
cannot afford to purchase a new oscilloscope, you can rent, rent-to-own, lease,
finance, or purchase used machines from companies such as Microlease.
A Note Before We Begin
All examples in this article
are based on the Tektronix MDO3104 oscilloscope.
While preparing this article
I contacted several test instrument makers —Rigol and
BK Precision also offered to make test instruments available for this article
and I would like to thank all companies for their generosity. They are all
world-class instruments.
This article is not intended
to be a how-to guide to the Tektronix MDO3104. It is meant to show you the
various capabilities and functions of most mid-range oscilloscopes through the
use of the Tektronix MDO3104 as an example.
I will show the steps needed
to use the machine I have—it is left to the reader to see the documentation on
their specific scope for specific key-presses and menu-options. I use bold to
indicate physical manipulation of the scope through knob-turn or button-press,
and quotation marks to indicate a menu choice.
Oscilloscope Displays
Oscilloscopes allow us to
determine relationships between certain variables in electrical circuits. Early
oscilloscopes were only able to show the relationship that exists between
potential difference and time. Today’s oscilloscopes continue the tradition of
measuring voltage vs. time while also providing an extensive collection of
sophisticated data-analysis capabilities, display features, and triggering
options.
To understand what electrical
relationships exist in your circuits, you have to know how to interpret what is
presented to you.
This is a typical single
waveform display in an oscilloscope, showing the time on the horizontal axis
and potential difference on the vertical axis.

In the lower left part of the
image, you will see ① 500mV
That indicates two things:
■ Channel 1 is displayed on the
oscilloscope in yellow.
■ For channel one each grid rectangle
corresponds to 500 mV in the vertical direction. So we have "500
millivolts per division" with 8 vertical rectangle visible, and thus
■ 500mV1division×8divisions=4V500mV1division×8divisions=4V
■ visible in the vertical direction
In the bottom left, you will
see another box that says AFG
Sine 100.00kHz 1.0000 Vpp:
● AFG Indicates the Arbitrary Function
Generator is active (I used it to create this waveform)
● Sine is the shape of the waveform
● 100.000 kHz is the frequency of the
waveform: 100,000 cycles each second.
● 1.0000 Vpp is
the amplitude of the transmitted waveform.
In the bottom-center there is another box with:
|
4.00
µs 5.00
GS/s ①∫ T →▼0.000000
s 1M points 0.00V |
● 4.00 µs is the value of each rectangle
in the horizontal direction: "4 microseconds per
division." The display includes 10 rectangles, so
● 4.00μs1 division×10divisions=40
μs4.00μs1
division×10divisions=40 μs
● of time
is visible across the entire screen.
● The oscilloscope is recording 5.00 GS/s,
i.e.,
● 5×1095×109
● samples per
second.
● Channel 1 is used to control the
triggering of the waveform.
● Triggering occurs on the rising edge of
the channel 1 waveform.
● The image
is centered at T →▼0.000000 s
from the trigger point.
● 1 million (1 M) data points will be
collected.
● Triggering occurs when a rising signal
passes through 0 V.
How to Make Basic Measurements with an Oscilloscope
To illustrate just how far
these oscilloscopes have come over the past few decades, I will begin by
showing you how many different ways the oscilloscope can be used to make basic
measurements of frequency (or period) and peak-to-peak amplitude.
Activate the Arbitrary Function Generator
Begin by connecting
oscilloscope channel 1 to the Arbitrary Function Generator (AFG) BNC connector
on the back of the scope. Activate the Arbitrary Function Generator
by pressing the AFG button directly above the Channel 1 probe
input. Press the first bottom menu button below "Waveform"
and use rotary knob Multipurpose a to select
"Ramp."
Turn on Channel 1
Press the Channel 1 button to
activate it. Rotate the Horizontal Scale knob clockwise to adjust
the scale to spread out a complete wave over most of the screen. Use
the Horizontal Position knob to adjust its location on the screen if you like.
Using the Graticule to
Make Measurements
The lines on an oscilloscope
display are called a graticule. There
are major and minor gridlines (or dots) that are used to measure
waveforms. Major gridlines are
displayed as solid or dotted lines that run the width or height of the
oscilloscope screen. The voltage and time that correspond to the
divisions formed by the major gridlines are shown at the bottom of the
display. Minor gridlines are subdivisions between major
gridlines. There are usually 4 or 5 subdivisions between gridlines. In
the following example, I usedtheHorizontal Position
rotary dial to move the waveform so that the positive peaks of the waveform
line up with major vertical gridlines.

In the vertical direction
there are 500 mV per division and the distance from lowest point to highest
point is 4 rectangles for
500mV1division×4divisions
from peak to peak=2000mVpp=2Vpp500mV1division×4divisions from peak to peak=2000mVpp=2Vpp
.
In the horizontal direction
there are 4.00 µs per division and there are 5 divisions before the signal
begins to repeat, giving
4.00μs1division×5divisions1period=20μs1period4.00μs1division×5divisions1period=20μs1period
.
Using the Cursors to Make Measurements
Digital oscilloscopes take
all guesswork out of using the graticule. Activate
the cursors by pressing theCursors button
and use rotary dials Multipurpose a and Multipurpose b to move
them to the parts of the waveform that you would like to inspect. In
the following example, I moved the cursors to the positive peaks of the wave.

You will see in the upper
right corner a new box that has information about the values of potential
difference and time for the points a and b. Here
we are interested in the interval of time between the two points, i.e.,
Δ20.00μsΔ20.00μs
.
To determine the Peak-to-Peak
potential difference, switch to horizontal cursors by pressing and
holding theCursors button again, selecting
"Cursors-Screen" and "Bars-Horizontal." Then use
Multipurpose a andMultipurpose b
knobs to adjust the position of the cursors and "Cursors linked" to
aid your adjustment. You can move between horizontal and vertical
measurements by pressing the Select button.
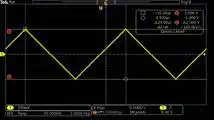
Here we are interested in the
potential difference between the two points, i.e.,
Δ2.000VΔ2.000V
.
Below is a video walkthrough
of the steps you'll need to follow. Each step uses orange highlights to
indicate the appropriate button or knob you'll need to use on the Tektronics model.
https://youtu.be/NOFsXoKne98
Using the Digital Volt Meter to Make Measurements
A useful feature found in
mid-range oscilloscopes is the DVM (Digital Volt Meter). The DVM
tool does everything you might expect a basic multimeter to
do. Enable it by pressing the Measure button in the Wave Inspector
box and then "DVM," and use Multipurposea to select
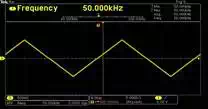
(for example) "Frequency." Here I am displaying the
frequency (in the center) along with frequency
statistics (on the right). I could also display AC+DC RMS voltage,
DC voltage, or AC RMS voltage.
Press the bottom menu button
below "Add Measurement" and use Multipurpose b
to select "Period", followed by "OK". Then
repeat "Add Measurement" and use Multipurpose b
to select "Amplitude", followed by "OK". Now
Period & Amplitude are shown at the bottom in a less obtrusive
fashion. You may remove them by selecting the button below
"Remove Measurement" followed by "Remove All
Measurements". You may simplify the display at any time by
pressing the Menu Off button.
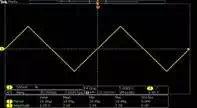
On the MDO3104, up to four
measurements can be displayed at the bottom; there are numerous measurements to
choose from (see http://www.tek.com/manual-topic/measure for more information).
Measurements from the Terminal
Just when you thought I'd run
out of ways to measure the same waveform, here comes the terminal. I
connected to the oscilloscope with Telnet, turned the DVM on remotely, set it
to record frequency, and queried the value. To accomplish this feat,
you will have to plug the oscilloscope into a switch or router on your local
network with an Ethernet cable. The oscilloscope will obtain an IP
address from the DHCP server and display it on the screen.
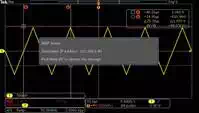
Then use your favorite terminal program to connect with the
oscilloscope. Here I used PuTTY to connect to the IP address on
the screen using the Telnet protocol.
The default port is 4000.
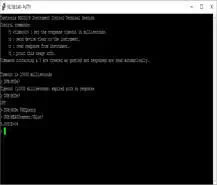
You can accomplish the same
on a Windows machine by opening the run dialog ("Windows Key" +
"R") and typing "telnet 192.168.0.40 4000".
DVM:MODe FREQuency //
Sets DVM Measurement mode to frequency
DVM:MEASUrement:VALue? //
Queries the oscilloscope and returns frequency measurement
Measurements from a Web Browser
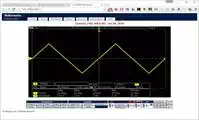
Why strain your neck looking
up or down at the oscilloscope screen when you can look at your computer
monitor instead? Here I have logged into the web interface to
inspect my waveform. It is as simple as navigating to the IP address
of your oscilloscope on port 81.
Using Advanced Math
The math tool allows all
manner of mathematical functions to be performed on waveforms—from simple
arithmetic to Fast Fourier Transforms and everything in between. Here
I am using the frequency measurement function to determine the frequency of my
waveform.
Press the Math button to
enter the math menu, followed by "Advanced Math", "Edit
Expression". UseMultipurpose a
to scroll through the functions and Select to choose "Frequency(1)"
and finally "OK".
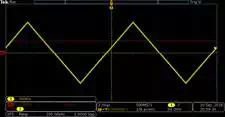
The math menu is somewhat
difficult to see. It is red in the lower left
corner. Where it displays 100 kHz, it is indicating 100 kHz per
division in the vertical direction. The horizontal red line (the
result of the math module's computation) is one division above zero, which
indicates a constant reading of 100 kHz. The 2.00 µs indicates that
there are 2.00 µs per division in the horizontal direction.