Getting Help Fast in Windows XP
Technique
Save Time By
Using Windows Help and Support the smart way
Creating shortcuts to Help topics ó and sending them to friends
Finding real answers to really vexing questions
Many people get to Windows XPís Help and Support Center, type a keyword, click
a bunch of links, and come away frustrated. In some cases, thatís because the
Help and Support Center leaves much to be desired (all those old, inaccurate
bits of recycled Windows 98 advice can really get frustrating, eh?). But in
many cases, you probably feel frustrated because the Help and Support Center
doesnít work like the rest of Windows. Help and Support has plenty of tools,
but theyíre hard to find. Besides, when youíre sitting in the Help and Support
Center, you want help about something thatís going wrong ó not help about Help,
if you know what I mean.
Take a few minutes to figure out how to handle Help, and you can use your
newfound knowledge to save yourself loads of time. This technique shows you
how. Quickly.
The Help and Support Center isnít the only game in town ó particularly when
youíre trying to fix something, and you canít get past the olí Microsoft Party
Line. Fortunately, some non-Microsoft options are worth turning to. In this
technique, I show you some of those, too.
Exploring the Help and Support Center
Think of Windows XPís Help and
Support Center as Internet Explorer, but with all the things that make IE easy
to use taken away. Thatís how I think of it, anyway.
Searching for Help rarely goes as easily as you might think. The other day I
wanted to find out how to use Windows XPís multimedia editing capabilities to
combine two movie clips. Hereís how my search for Help went:
1 .Choose Start Help and Support Center.
The Help and Support Center main window appears, as shown in Figure 62-1. Your
main page may look a little different because some hardware manufacturers jimmy
the main Help page to add references to their own sites.

ē Figure 62-1: HSCís main window.
2. Type your search topic in the
Search box and press Enter.
In this example, I typed combine movie clips and pressed Enter.
Help searches the list of predefined keywords in its Help articles to come up
with the links under Suggested Topics.
Then it searches all the text in all its Help articles to arrive at the entries
under Full-Text Search Matches.
Finally, it reaches out to the Knowledge Base to return the articles mentioned
under Microsoft Knowledge Base.
If Help doesnít find anything (and it didnít for my movie clip search), it
tells you it found 0 search results.
If you want to save time using the search options, I suggest that you use the
Suggested Topics search. This search option works very quickly because Help
only has to scan its index (on the other hand, you also can just as
easily do this yourself, as I explain in Step 3). The Full-Text Match search
goes much slower because Help scans for matches on all the words that you typed
in the Search box, and then for individual words in the Search box. The
Microsoft Knowledge Base search can take years, and itís most likely to turn up
obscure articles, frequently bearing little resemblance to what you seek.
3. If you strike out doing a
standard search, look at the index. Click the Index icon up at the top of the
screen.
Help brings up its index, which is a bit like the index in a topic.
4. Type the search topic youíre
looking for.
In this example, I typed movie, and the index moves down to the movie entries
(see Figure 62-2).

ē Figure 62-2: The index follows along as you type.
5, Select the index topic that is closest to the one that youíre searching for
information about.
In this example, I selected Movie Maker, and the Windows Help and Support
Center responds with a blurb about Movie Maker.
6, If Windows Help and Support Center doesnít have an answer, you may have to
try looking inside the Help systems for individual Windows programs.
In this example, the Windows Movie Maker blurb isnít any help, so I dug into
Windows Movie Makerís help. With Movie Maker open, I chose Help Help Topics
Search, typed combine in the Search For box, and pressed Enter. I selected the
To Combine Contiguous Clips entry, and I was finally (finally!) rewarded with
the explanation.
Unless Microsoft has a special article that covers precisely the problem you
want to solve, you really have to hunt to find answers to questions in the
Windows Help and Support Center! Sometimes you can dig into individual
applications ó as I did in this example with Windows Movie Maker. Sometimes
youíre left dangling with no help in sight.
Using Help Effectively
Hereís what you need to know about Windows XPís Help and Support Center:
The Search box only looks for
keywords.
ďNatural languageĒ questions confuse it. For example, if you search for install
scanner, the Install a Scanner or Digital Camera task appears as the first
choice. If you type How do I install a scanner?, the Install a Scanner or
Digital Camera task doesnít even show up.
Frequently, Help ignores what you type.
Sometimes you can use the search modifying terms that Microsoft documents in
the Help and Support Center (see Figure 62-3), but Iíve had lots of problems
with them.
The Search engine is buggy. For example, if you search for clip not movie, the
first hit in Suggested Topics doesnít include either of the terms clip or movie,
and the first four hits from the Knowledge Base contain both clip and movie.
Unfortunately, I donít know any way to work around the bugs in the Search
engine.
You canít search for a specific word or phrase inside a Help article. In other
words, you canít use an Internet Explorer-like Edit Find function.
If you want to search for something inside a Help article, select the article,
copy it and paste it into, say, Notepad or Word, and use that program to search
the pasted-in text.

ē Figure 62-3: Sometimes these modifiers work. Many times they donít.
Help always highlights search terms in found Help articles ó any word you type in
the Search box appears in the Help article with a gray background. Most people
find this really aggravating. To turn off this function, click the Options icon
on the main Help toolbar, choose Set Search Options, and uncheck the Turn On
Search Highlight box.
Helpís Table of Contents can be very useful ó if you can figure out how to get
to it! Start by searching for a topic. After you find it (see Figure 62-4),
click the Locate in Contents button. Youíre taken to the appropriate place in
the (hidden!) Help Table of Contents (see Figure 62-5). From there, you may be
able to get at related items of interest.
To get out of the Table of Contents, click the Back button on the main Help
screen.
Helpís Favorites feature (which doesnít hold a candle to Internet Explorerís)
can come in handy ó if you only have a few Favorites.
Otherwise, itís truly lame. When you find an article in Help that you want to
bookmark, click the Add to Favorites icon (refer to Figure 62^1). To see a list
of all your bookmarked Favorites, click the Favorites icon at the top of the
Help window.
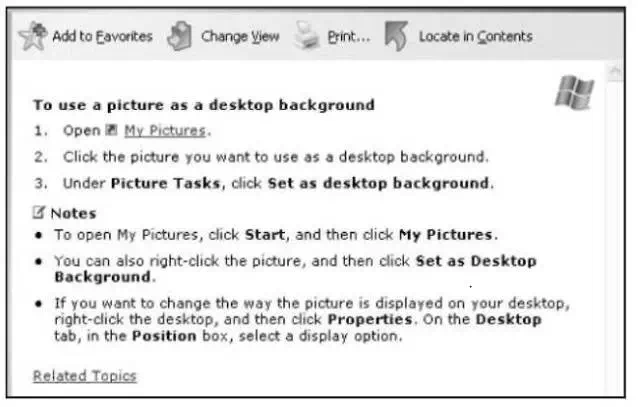
ē Figure 62-4: Locate in Contents.
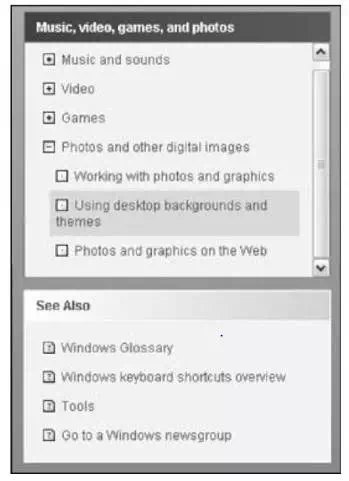
ē Figure 62-5: You can only get into the Table of Contents via this
circuitous method.
Getting to Help Sections óQuickly
Creating a shortcut to a specific
Help article is easy. You can put the shortcut on your desktop, or you can e-mail
the shortcut to another user. If your friend double-clicks the shortcut, Help
comes up looking at the precise article that you chose.
E-mailing a shortcut is particularly useful because itís very, very hard to
tell another Windows XP user how to get to a specific Help article.
To create a shortcut to a help topic on the desktop, follow these steps:
7. Choose Start Help and Support.
2, Navigate to the Help article.
3, Right-click in the body of the Help article and choose Properties.
Help shows you the Properties dialog box for that particular Help article. (See
Figure 62-6).
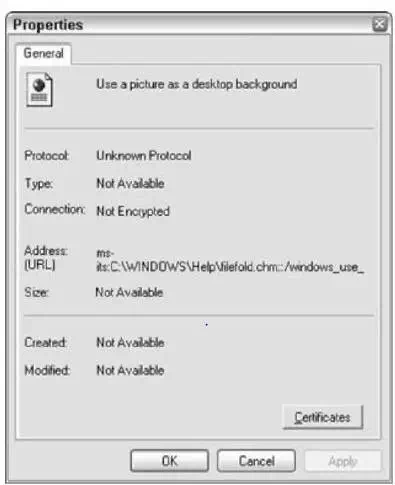
ē Figure 62-6: A Properties dialog box for a Help article.
4, Click inside the Address (URL) section, press Ctrl+A to select the entire
address of the Help article, and then press Ctrl+C to copy it to the Clipboard.
Copying the address may be a bit difficult because the addresses tend to be
quite long ó so long that you canít see them in their entirety.
5, Click the Cancel button to get out of the Properties dialog box.
6, Choose Start My Computer, and in Windows Explorer, work your way down to
C:\Windows\ PCHEALTH\HELPCTR\Binaries.
Windows Explorer looks like Figure 62-7.
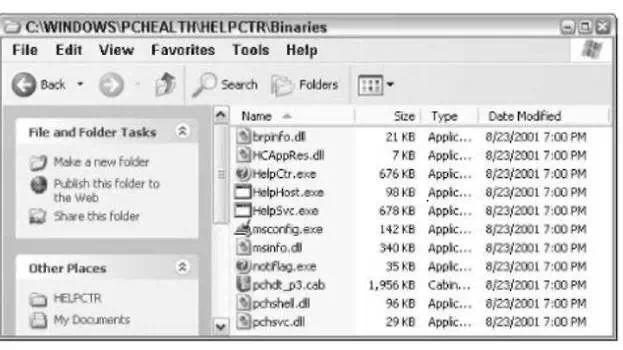
ē Figure 62-7: Navigate to HelpCtr.exe.
7 Right-click HelpCtr.exe and choose Send To Desktop (create Shortcut). Click the
Close button to exit Windows Explorer.
Your Windows desktop has a new Shortcut to HelpCtr.exe icon.
8. Right-click the new shortcut on the desktop and choose Properties.
You see the Properties dialog box in Figure 62-8.
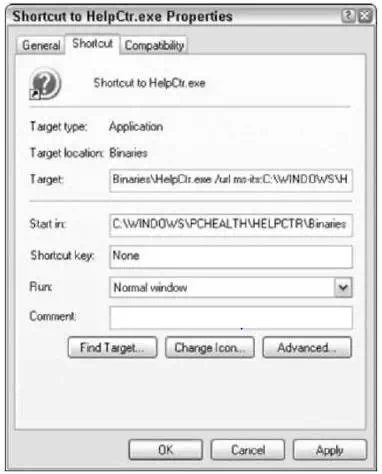
ē Figure 62-8: Change the shortcut to point to the Help article.
9, Press the End key to go to the end of the Target box, press the spacebar,
type /url and press the spacebar again, and then press Ctrl+V to paste in the
address of the Help article.
10, Click OK.
ff. Double-click the icon to test it.
You go directly to the Help article.
You can rename the shortcut, e-mail it, and even copy it into a Word document.
Double-clicking the shortcut on any Windows XP computer brings up the precise
Help topic you chose.