Working with Objects, Comments, Tables
Snap Shot In this lecture you will learn about working with Inserting objects, inserting drawing, in place comments and it will guide you how to familiarize these things.
Word includes a set of drawing tools when you display the Drawing toolbar. This is done using either the View / Toolbars menu selection or by clicking the Drawing button on the Standard toolbar.
Working with text boxes and frames
A text box is an open rectangle that is placed within a document using the Insert/ Text Box menu selection. You can type text within the text box. The text can be rotated 90 degrees for special effects. One text box can be linked to a following, empty text box so that text that overflows the boundaries of the first text box continues into another designated text box. Text boxes can contain pictures as well as text, and therefore can be used like a frame. Text box borderlines and colors are changed or removed using the Colors and Lines tab of the Format Text Box dialog (accessed from the Format menu).
Previous versions of Word made use of frames. Readers who are familiar with frames should know that a text box and can be quickly converted to a frame. Selecting a text box and clicking the format does this. Then select the Text Box tab and click the Convert to Frame button. Word’s menu selections and dialog boxes often vary with the current selection. For example, when you select a frame, Format / Frame replaces Format / Text Box. Word 2000 frames are similar, but not identical, to earlier Word frames. For example, precise scaling of a graphic object is no longer possible using the percentage readout on the status bar.
Both text boxes and frames can be clicked and dragged, resized, and even copied and deleted just like any other object within a Word document. You can also select a passage of text and use Insert / Text Box to put the selected text inside a text box. Finally, the Drawing toolbar includes a Text Box button, making it easy to put a drawing inside a text box. Once a text box is inserted into your document, you can select it and use the Format Text Box dialog box, which is displayed using the Format / Text Box menu selection, to set a number of controls including text wrapping, position, and the distance to adjacent elements.
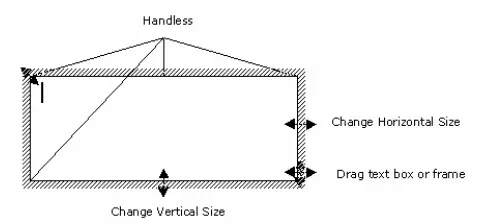
There are a number of available cursors associated with frames and other inserted objects.
Note:
After clicking Insert / Text Box, you will see the cursor at the place you chose to place the text box. The mouse pointer will change to crosshairs, which is your prompt to left-click and drag the crosshairs to dimension the size of the text box. The Text Box dialog shown becomes visible when you select the text box by clicking on it.
A cross hair cursor is used to insert and size a frame. Handles are filled squares located in the corners and on the centre of each side. This tells you that the text box or frame is selected and ready for modification. When active, it can be resized, repositioned, deleted, cut, or copied.
A double-headed arrow is used to stretch the text box or frame horizontally, vertically, or diagonally. Placing the cursor near a handle changes it into a double-headed arrow. You can crop out unwanted white space or images by pressing the key while dragging a handle in or out. Cropping is a technique used to take out unwanted background areas. Press the key to adjust opposite sides by the same amount.
The crossed double-headed arrow cursor is used to move the text box or frame. When the cursor changes to a crossed double-headed arrow symbol, you can pick a text box or frame with a mouse click and drag it to a new location within your document. You can also cut and paste a frame to move it to another location in your document or, for that matter, to another document using drag and drop.
An anchor symbol indicates the paragraph to which a text box or frame is tied. If the line moves when preceding text is inserted or deleted, the text box or frame moves with the paragraph to which it is anchored.
Charts and pictures, which are typical objects, are automatically loaded into resizable frames of their own. You can also put an object within a text box or frame to achieve text runarounds, in which the text of your document wraps .
around an object, such as a picture or chart. There are a number of run-around settings to choose from. The hands-on activity shows you the effect of run-arounds.
The text box borders are controlled by the Colours and Lines tab of the Format Text Box dialog. You can also use the Format / Borders and Shading menu to adjust the appearance of borders. The combination of the Format Text Box and Borders and Shading dialogs gives you a large number of options for borders, colours, interior fills, and shading.
The following hands-on activity guides you through the creation and editing of text boxes and borders. It also introduces you to text box links.