Master Document
Word’s master document feature, which is accessed using View / Outline, is used to combine two or more documents into a larger, fully paginated document. An ideal use for the master document feature is to integrate and control the pagination (page numbers, headers, footers, etc.) of several documents containing chapters of a book into a single, multi chapter book. Master documents put the pages of each subdocument (such as a chapter) in the proper sequential order, i.e., 1 to n. You can also use Insert / Index and Tables to prepare a complete table of contents, table of figures, table of authorities, and an alphabetical index.
Changes to subdocuments within a book often move headings and words contained in your alphabetical index to different pages. The new page numbers associated with moved elements are automatically adjusted. Just delete the old table or index and rerun the table of contents and re-index to capture the changes. This eliminates the need to edit your book’s front matter (list of tables) and indexes every time you make a change. If you create large, multi-chapter documents, becoming proficient with Word’s master document feature will save you a lot of time.
Each new subdocument within a master document is put in a separate section. You can use the Layout tab of the Page Setup dialog to control the way your sections behave. For example, you may want each section to begin on an odd numbered, right-hand page; have a running header on every left-hand page of the book and unique chapter headers on the right-hand pages; and use small Roman numerals in the front matter (title page, copyright page, and contents pages) and regular Arabic numerals in the balance of the book. It is easy to obtain these effects when you use the Master Document and Section features available in Word.
The outlining and Master Document Toolbars
When you display a document in the Outline view, the Outlining and Master Document toolbars appear.
![]()
Use the Outlining toolbar to apply different heading levels or body text to selected headings, paragraphs, and lists. The Outlining toolbar begins with the Promote button and includes all the buttons to the right until the Master Document View button.
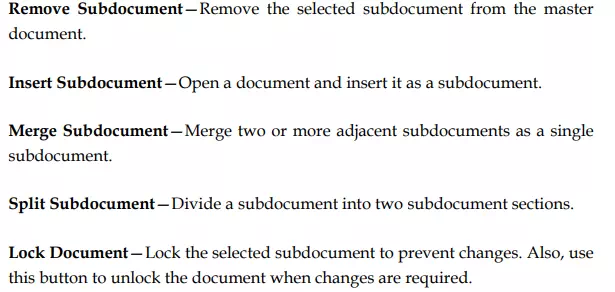
The Master Document toolbar begins with the Master Document View button and includes all the toolbar buttons to the right. Use the Master Document toolbar to manage subdocuments that comprise the master document under construction.
You can display the button names in the usual manner. Just put your mouse pointer on a button to display a descriptive label. Look at the status bar at the bottom of your screen to see additional information about the button. Following is a description of each of the buttons on the Outlining and Master Document toolbars. These toolbars are displayed when you choose View / Master Document.
Outlining Toolbar
This toolbar promotes, demotes, and applies different heading styles to one or more selected list elements or paragraphs.
Promote—Increase the selected paragraph to the next higher heading level, i.e., promote a “Heading 3” to a “Heading 2.”


Using Master Document
Following is a step-by-step approach for creating a book (or similar multi chapter document) that is created by using several smaller documents. The procedure also guides 0you through creating a table of contents and index.
Note: The following procedure makes use of existing documents. These are inserted into the master document as subdocuments. You can also create and edit new and revised documents directly into a master document. Hence, there are many ways to create and save master documents. You may wish to experiment with the Master Document toolbar until you find the method you like best.
Document Creation
1. Create and save each section or chapter of a book as an individual document. End each document with a carriage return. Be sure to assign a descriptive name, such as Chap01.doc, Chap02.doc, etc. Using sequential names sorts them within the active file folder, making each subdocument file easy to find.
2. Open a new document after all individual chapter documents have been created and saved.
3. Click View / Outline to display the Outlining and Master Document toolbars.
4. Click the Insert Subdocument button, pick the first document in sequence, and click OK.
5. Press to go to the end of the first document. Backspace so that you delete the section break at the bottom of the inserted document.
6. With the cursor on a new line (at the end of the first section), click Insert Subdocument again.
7. Pick the second document to be inserted and click OK. The first two subdocuments are inserted.
8. Again, delete the last section break and put the cursor on a new line at the bottom of the last section. Then insert the third subdocument as above.
9. Continue inserting your subdocuments in the proper order until all are included within your master document.