Check Sheets

The Check Sheet is a simple document that is used for collecting data in real time and at the location where the data is generated. The document is typically a blank form that is designed for the quick, easy, and efficient recording of the desired information, which can be either quantitative or qualitative. When the information is quantitative, the check sheet is sometimes called a tally sheet. The check sheet is one of the seven basic tools of quality control made popular by Dr. Kaoru Ishikawa.
The Check Sheet is a simple document that is used for collecting data in real time and at the location where the data is generated. The document is typically a blank form that is designed for the quick, easy, and efficient recording of the desired information, which can be either quantitative or qualitative. When the information is quantitative, the check sheet is sometimes called a tally sheet. The check sheet is one of the seven basic tools of quality control made popular by Dr. Kaoru Ishikawa.
A defining characteristic of a check sheet is that data is recorded by making marks (“checks”) on it. A typical check sheet is divided into regions, and marks made in different regions have different significance. Data is read by observing the location and number of marks on the sheet. Five basic types of check sheets include:
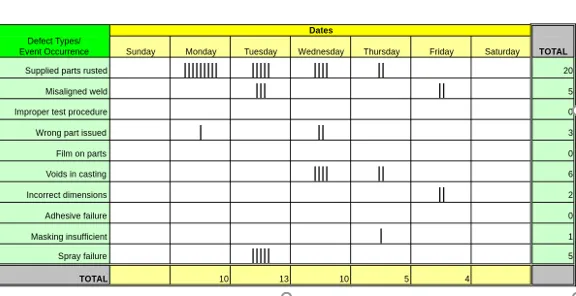
Classification check sheet: A trait such as a defect must be classified into a category. If you just kept track of the total defects, you would know that you had 101 total defects. That is somewhat useful but that, in and of itself, does not provide much insight as to which day is the worst day or which source of defects is in the worst shape, etc. With a classification check sheet, it provides a visual overview of the problem areas.
Defect location check sheet: The physical location of a trait is indicated on a picture, or illustration of a part or item being evaluated. Instead of just keeping track of the number of defects, the defect location check sheet can sometimes reveal an area of the product that tends to see most of the defects. Once this is known, the team can go back to the process to see what it is about the upper right-hand corner of the product that is causing the defects.
Frequency check sheet: The presence or absence of a trait or combination of traits is indicated. Also, number of occurrences of a trait on a part can be indicated. Notice that if you just tracked the number of defects, you may not realize that Wrong Color has the highest frequency of occurrence. Furthermore, if Wrong Color was not broken down further, you might not realize that GREEN is giving you the most defects.
Measurement scale check sheet: A measurement scale is divided into intervals and measurements are indicated by checking an appropriate interval.
Check List: The items to be performed for a task are listed so that as each is accomplished it can be marked as having been completed.