Have you ever thought about how the implementation of a location-based augmented reality app looks in the code? You’ll have a chance to see how to build a simple app that displays some objects in the real world. But let’s start with a bit of theory.
*Geodesy theory is based on the book: A. Jagielski, Geodezja I, GEODPIS , 2005.
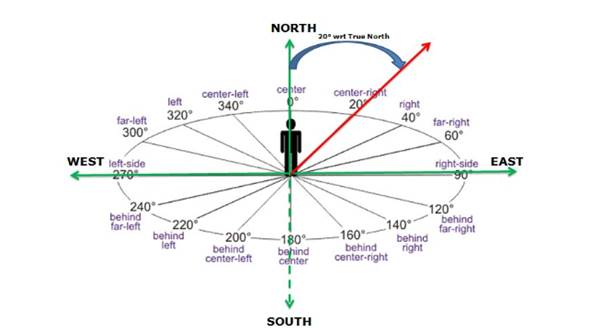
Wikipedia explains the azimuthal angle as:
“The azimuth is the angle formed between a reference direction (North) and a line from the observer to a point of interest projected on the same plane as the reference direction orthogonal to the zenith”
Azimuth is a special type of heading angle (angle between two points in reference to the north). In case of azimuth, one point is your location and the second point is based on the direction you are facing.
We will use a formula based on the “haversine formula” where the heading angle from point A to B can be calculated as:
β = atan2(X,Y),
∆ = LongitudeB - LongitudeA
X = cos LatitudeA * sin ∆
Y = cos LatitudeA * sin LatitudeB – sin LatitudeA * cos LatitudeB * cos ∆
This is how it looks in code:
private fun calculateHeadingAngle(
currentLocation:
LocationData,
destinationLocation: LocationData
): Float {
val currentLatitudeRadians = Math.toRadians(currentLocation.latitude)
val destinationLatitudeRadians = Math.toRadians(destinationLocation.latitude)
val deltaLongitude =
Math.toRadians(destinationLocation.longitude - currentLocation.longitude)
val y = cos(currentLatitudeRadians)
* sin(destinationLatitudeRadians)
- sin(currentLatitudeRadians)
* cos(destinationLatitudeRadians)
* cos(deltaLongitude)
val x = sin(deltaLongitude) * cos(destinationLatitudeRadians)
val headingAngle = Math.toDegrees(atan2(x, y)).toFloat()
return (headingAngle + 360) % 360
}
Kotlin
I’m returning values in the 0 to 360 degrees range, which is why the heading angle is modified before being returned.
In this tutorial, I will not describe how to get the location and azimuth orientation of the device because this is very well documented and there are a lot of tutorials online. Mainly for reference, please read Sensors Overview (especially TYPEROTATION_VECTOR) and Location Services.
One thing that you need to remember is that sensor readings can return values that change fast. There are lots of different variables that impact the data you receive (lots of devices around you, calibration of your phones sensors). In order to harness them you can use something called a “low pass filter”. It will smooth out the readings.
private fun lowPassDegreesFilter(azimuthRadians: Float): Float {
lastSin = alpha * lastSin + (1 - alpha) * sin(azimuthRadians)
lastCos = alpha * lastCos + (1 - alpha) * cos(azimuthRadians)
return ((
Math.toDegrees(atan2(lastSin, lastCos).toDouble()
)+ 360) % 360).toFloat()
}
Kotlin
This is a version adjusted to our 0-360 degree case. You can try different alpha values to get different smoothness results.
Once you’ve prepared data from the sensors, it’s time to prepare the camera preview. We will use the CameraX API as it really simplifies the whole process.
You need to add a view in your XML:
TextureView
android:id="@+id/texture_view"
android:layout_width="match_parent"
android:layout_height="match_parent" /
XML
And after that in your fragment/activity :
private fun startCameraPreview() {
val preview = AutoFitPreviewBuilder.build(
PreviewConfig.Builder().build(),
texture_view)
CameraX.bindToLifecycle(lifecycleOwner, preview)
}
Kotlin
And that’s it! Your camera preview is bound to the lifecycle and you don’t have to worry about it anymore. AutoFitPreviewBuilder is taken from the Google CameraX sample.
Now the data you need to show the destination on the screen:
Once we have these, we can get a “destination azimuth” :
val currentDestinationAzimuth =
(headingAngle - currentAzimuth + 360) % 360
This is the angle that shows how you should be oriented in order to reach your destination. Long story short: when the destination azimuth is equal to zero, that means that you are heading in the right direction and the destination point should be displayed in the center of your view!
Since Google and Apple presented their AR engines (ARCore and ARKit), augmenting views via phone cameras became more popular. Both solutions are really powerful and you can do magic with them. On the other hand, you do not need a sledgehammer to crack a nut. This is especially true when you need only a simple AR view that will not drain the battery. That’s why we’ve implemented location-based augmented reality and published it as an open source library: ARLocalizerView available on GitHub
ARLocalizerView is a simple tool to display points of interest like ATMs, landmarks or bus stops overlayed on the camera view of a smartphone. Our engine automatically calculates the azimuth to a given point and maps it on the screen. The library also automatically calculates the distance between the point of interest and the user’s location. Thanks to our algorithm the solution will not drain the battery, is really lightweight, and super easy to use.