Android - Hello World Example
Let us start actual programming with Android Framework. Before you start writing your first example using Android SDK, you have to make sure that you have set-up your Android development environment properly as explained in Android - Environment Set-up tutorial. I also assume that you have a little bit working knowledge with Android studio.
So let us proceed to write a simple Android Application which will print "Hello World!".
Create Android Application
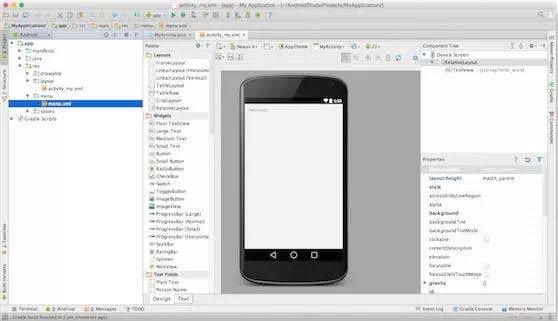
The first step is to create a simple Android Application using Android studio. When you click on Android studio icon, it will show screen as shown below
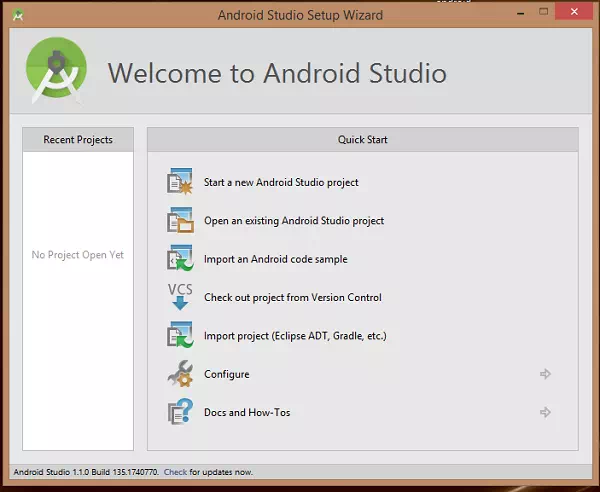
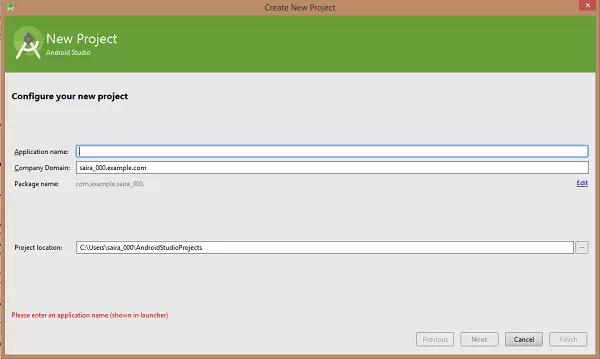
You can start your application development by calling start a new android studio project. in a new installation frame should ask Application name, package information and location of the project.−
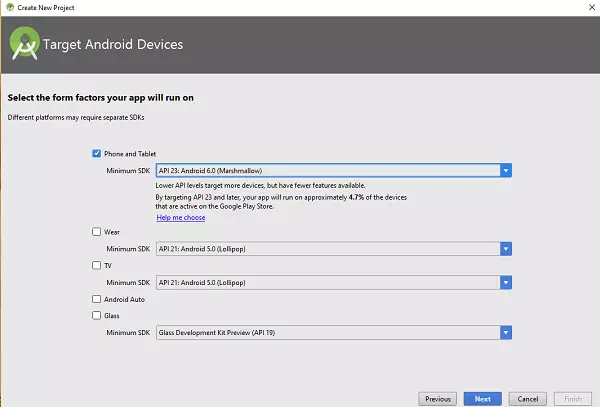
After entered application name, it going to be called select the form factors your application runs on, here need to specify Minimum SDK, in our tutorial, I have declared as API23: Android 6.0(Mashmallow) −
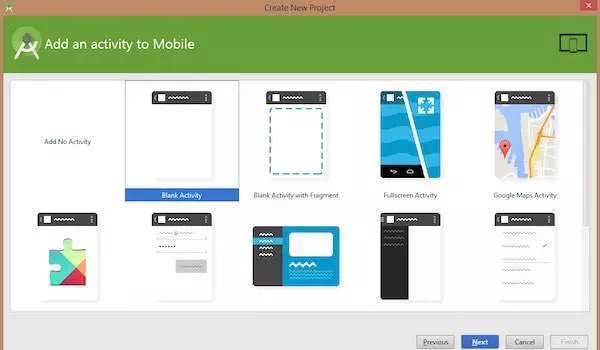
The next level of installation should contain selecting the activity to mobile, it specifies the default layout for Applications.
At the final stage it going to be open development tool to write the application code.
Anatomy of Android Application
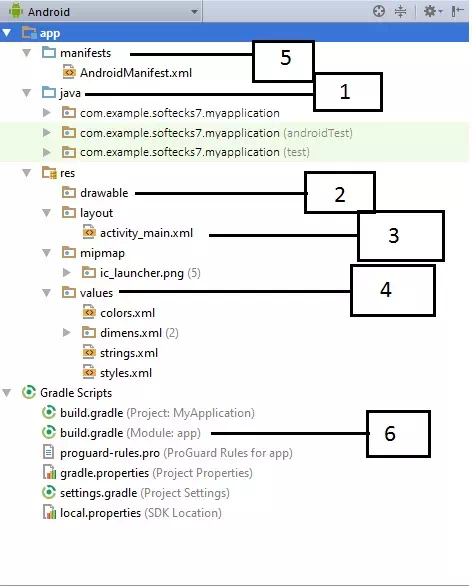
Before you run your app, you should be aware of a few directories and files in the Android project −
|
Sr.No. |
Folder, File & Description |
|
1 |
Java This contains the .java source files for your project. By default, it includes an MainActivity.java source file having an activity class that runs when your app is launched using the app icon. |
|
|
|
|
2 |
res/drawable-hdpi This is a directory for drawable objects that are designed for high-density screens. |
|
3 |
res/layout This is a directory for files that define your app's user interface. |
|
4 |
res/values This is a directory for other various XML files that contain a collection of resources, such as strings and colours definitions. |
|
5 |
AndroidManifest.xml This is the manifest file which describes the fundamental characteristics of the app and defines each of its components. |
|
6 |
Build.gradle This is an auto generated file which contains compileSdkVersion, buildToolsVersion, applicationId, minSdkVersion, targetSdkVersion, versionCode and versionName |
Following section will give a brief overview of the important application files.
The Main Activity File
The main activity code is a Java file MainActivity.java. This is the actual application file which ultimately gets converted to a Dalvik executable and runs your application. Following is the default code generated by the application wizard for Hello World! application −
package com.example.helloworld;
import android.support.v7.app.AppCompatActivity;
import android.os.Bundle;
public class MainActivity extends AppCompatActivity {
@Override
protected void onCreate(Bundle savedInstanceState) {
super.onCreate(savedInstanceState);
setContentView(R.layout.activity_main);
}
}
Here, R.layout.activity_main refers to the activity_main.xml file located in the res/layout folder. The onCreate() method is one of many methods that are figured when an activity is loaded.
The Manifest File
Whatever component you develop as a part of your application, you must declare all its components in a manifest.xml which resides at the root of the application project directory. This file works as an interface between Android OS and your application, so if you do not declare your component in this file, then it will not be considered by the OS. For example, a default manifest file will look like as following file −
<?xml version="1.0" encoding="utf-8"?>
<manifest xmlns:android="http://schemas.android.com/apk/res/android"
package="com.example.softecks7.myapplication">
<application
android:allowBackup="true"
android:icon="@mipmap/ic_launcher"
android:label="@string/app_name"
android:supportsRtl="true"
android:theme="@style/AppTheme">
<activity android:name=".MainActivity">
<intent-filter>
<action android:name="android.intent.action.MAIN" />
<category android:name="android.intent.category.LAUNCHER" />
</intent-filter>
</activity>
</application>
</manifest>
Here <application>...</application> tags enclosed the components related to the application. Attribute android:icon will point to the application icon available under res/drawable-hdpi. The application uses the image named ic_launcher.webp located in the drawable folders
The <activity> tag is used to specify an activity and android:name attribute specifies the fully qualified class name of the Activity subclass and the android:label attributes specifies a string to use as the label for the activity. You can specify multiple activities using <activity> tags.
The action for the intent filter is named android.intent.action.MAIN to indicate that this activity serves as the entry point for the application. The category for the intent-filter is named android.intent.category.LAUNCHER to indicate that the application can be launched from the device's launcher icon.
The @string refers to the strings.xml file explained below. Hence, @string/app_name refers to the app_name string defined in the strings.xml file, which is "HelloWorld". Similar way, other strings get populated in the application.
Following is the list of tags which you will use in your manifest file to specify different Android application components −
● <activity>elements for activities
● <service> elements for services
● <receiver> elements for broadcast receivers
● <provider> elements for content providers
The Strings File
The strings.xml file is located in the res/values folder and it contains all the text that your application uses. For example, the names of buttons, labels, default text, and similar types of strings go into this file. This file is responsible for their textual content. For example, a default strings file will look like as following file −
<resources>
<string name="app_name">HelloWorld</string>
<string name="hello_world">Hello world!</string>
<string name="menu_settings">Settings</string>
<string name="title_activity_main">MainActivity</string>
</resources>
The Layout File
The activity_main.xml is a layout file available in res/layout directory, that is referenced by your application when building its interface. You will modify this file very frequently to change the layout of your application. For your "Hello World!" application, this file will have following content related to default layout −
<RelativeLayout xmlns:android="http://schemas.android.com/apk/res/android"
xmlns:tools="http://schemas.android.com/tools"
android:layout_width="match_parent"
android:layout_height="match_parent" >
<TextView
android:layout_width="wrap_content"
android:layout_height="wrap_content"
android:layout_centerHorizontal="true"
android:layout_centerVertical="true"
android:padding="@dimen/padding_medium"
android:text="@string/hello_world"
tools:context=".MainActivity" />
</RelativeLayout>
This is an example of simple RelativeLayout which we will study in a separate chapter. The TextView is an Android control used to build the GUI and it have various attributes like android:layout_width, android:layout_height etc which are being used to set its width and height etc.. The @string refers to the strings.xml file located in the res/values folder. Hence, @string/hello_world refers to the hello string defined in the strings.xml file, which is "Hello World!".
Running the Application
Let's try to run our Hello
World! application we just created. I assume you had created your AVD
while doing environment set-up. To run the app from Android studio, open one of
your project's activity files and click Run  icon
from the tool bar. Android studio installs the app on your AVD and starts it
and if everything is fine with your set-up and application, it will display
following Emulator window −
icon
from the tool bar. Android studio installs the app on your AVD and starts it
and if everything is fine with your set-up and application, it will display
following Emulator window −
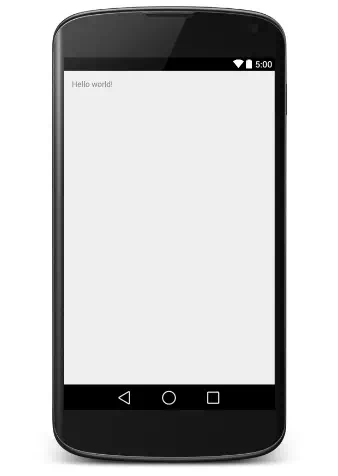
Congratulations!!! you have developed your first Android Application and now just keep following rest of the tutorial step by step to become a great Android Developer. All the very best.
Android Resources Organizing & Accessing
There are many more items which you use to build a good Android application. Apart from coding for the application, you take care of various other resources like static content that your code uses, such as bitmaps, colors, layout definitions, user interface strings, animation instructions, and more. These resources are always maintained separately in various sub-directories under res/ directory of the project.
This tutorial will explain you how you can organize your application resources, specify alternative resources and access them in your applications.
Organize resource in Android Studio
MyProject/
app/
manifest/
AndroidManifest.xml
java/
MyActivity.java
res/
drawable/
icon.webp
layout/
activity_main.xml
info.xml
values/
strings.xml
|
Sr.No. |
Directory & Resource Type |
|
1 |
anim/ XML files that define property animations. They are saved in res/anim/ folder and accessed from the R.anim class. |
|
2 |
color/ XML files that define a state list of colors. They are saved in res/color/ and accessed from the R.color class. |
|
3 |
drawable/ Image files like .webp, .webp, .webp or XML files that are compiled into bitmaps, state lists, shapes, animation drawable. They are saved in res/drawable/ and accessed from the R.drawable class. |
|
4 |
layout/ XML files that define a user interface layout. They are saved in res/layout/ and accessed from the R.layout class. |
|
5 |
menu/ XML files that define application menus, such as an Options Menu, Context Menu, or Sub Menu. They are saved in res/menu/ and accessed from the R.menu class. |
|
6 |
raw/ Arbitrary files to save in their raw form. You need to call Resources.openRawResource() with the resource ID, which is R.raw.filename to open such raw files. |
|
7 |
values/ XML files that contain simple values, such as strings, integers, and colors. For example, here are some filename conventions for resources you can create in this directory − ● arrays.xml for resource arrays, and accessed from the R.array class. ● integers.xml for resource integers, and accessed from the R.integer class. ● bools.xml for resource boolean, and accessed from the R.bool class. ● colors.xml for color values, and accessed from the R.color class. ● dimens.xml for dimension values, and accessed from the R.dimen class. ● strings.xml for string values, and accessed from the R.string class. ● styles.xml for styles, and accessed from the R.style class. |
|
8 |
xml/ Arbitrary XML files that can be read at runtime by calling Resources.getXML(). You can save various configuration files here which will be used at run time. |
Alternative Resources
Your application should provide alternative resources to support specific device configurations. For example, you should include alternative drawable resources ( i.e.images ) for different screen resolution and alternative string resources for different languages. At runtime, Android detects the current device configuration and loads the appropriate resources for your application.
To specify configuration-specific alternatives for a set of resources, follow the following steps −
● Create a new directory in res/ named in the form <resources_name>-<config_qualifier>. Here resources_name will be any of the resources mentioned in the above table, like layout, drawable etc. The qualifier will specify an individual configuration for which these resources are to be used. You can check official documentation for a complete list of qualifiers for different type of resources.
● Save the respective alternative resources in this new directory. The resource files must be named exactly the same as the default resource files as shown in the below example, but these files will have content specific to the alternative. For example though image file name will be same but for high resolution screen, its resolution will be high.
Below is an example which specifies images for a default screen and alternative images for high resolution screen.
MyProject/
app/
manifest/
AndroidManifest.xml
java/
MyActivity.java
res/
drawable/
icon.webp
background.webp
drawable-hdpi/
icon.webp
background.webp
layout/
activity_main.xml
info.xml
values/
strings.xml
Below is another example which specifies layout for a default language and alternative layout for Arabic language.
MyProject/
app/
manifest/
AndroidManifest.xml
java/
MyActivity.java
res/
drawable/
icon.webp
background.webp
drawable-hdpi/
icon.webp
background.webp
layout/
activity_main.xml
info.xml
layout-ar/
main.xml
values/
strings.xml
Accessing Resources
During your application development you will need to access defined resources either in your code, or in your layout XML files. Following section explains how to access your resources in both the scenarios −
Accessing Resources in Code
When your Android application is compiled, a R class gets generated, which contains resource IDs for all the resources available in your res/ directory. You can use R class to access that resource using sub-directory and resource name or directly resource ID.
Example
To access res/drawable/myimage.webp and set an ImageView you will use following code −
ImageView imageView = (ImageView) findViewById(R.id.myimageview);
imageView.setImageResource(R.drawable.myimage);
Here first line of the code make use of R.id.myimageview to get ImageView defined with id myimageview in a Layout file. Second line of code makes use ofR.drawable.myimage to get an image with name myimage available in drawable sub-directory under /res.
Example
Consider next example where res/values/strings.xml has following definition −
<?xml version="1.0" encoding="utf-8"?>
<resources>
<string name="hello">Hello, World!</string>
</resources>
Now you can set the text on a TextView object with ID msg using a resource ID as follows −
TextView msgTextView = (TextView) findViewById(R.id.msg);
msgTextView.setText(R.string.hello);
Example
Consider a layout res/layout/activity_main.xml with the following definition −
<?xml version="1.0" encoding="utf-8"?>
<LinearLayout xmlns:android="http://schemas.android.com/apk/res/android"
android:layout_width="fill_parent"
android:layout_height="fill_parent"
android:orientation="vertical" >
<TextView android:id="@+id/text"
android:layout_width="wrap_content"
android:layout_height="wrap_content"
android:text="Hello, I am a TextView" />
<Button android:id="@+id/button"
android:layout_width="wrap_content"
android:layout_height="wrap_content"
android:text="Hello, I am a Button" />
</LinearLayout>
This application code will load this layout for an Activity, in the onCreate() method as follows −
public void onCreate(Bundle savedInstanceState) {
super.onCreate(savedInstanceState);
setContentView(R.layout.main_activity);
}
Accessing Resources in XML
Consider the following resource XML res/values/strings.xml file that includes a color resource and a string resource −
<?xml version="1.0" encoding="utf-8"?>
<resources>
<color name="opaque_red">#f00</color>
<string name="hello">Hello!</string>
</resources>
Now you can use these resources in the following layout file to set the text color and text string as follows −
<?xml version="1.0" encoding="utf-8"?>
<EditText xmlns:android="http://schemas.android.com/apk/res/android"
android:layout_width="fill_parent"
android:layout_height="fill_parent"
android:textColor="@color/opaque_red"
android:text="@string/hello" />
Now if you will go through previous chapter once again where I have explained Hello World! example, and I'm sure you will have better understanding on all the concepts explained in this chapter. So I highly recommend to check previous chapter for working example and check how I have used various resources at very basic level.